

Okay, friends, gather ’round! Because I’m about to spill the beans on a recipe that’ll make your kitchen smell like pure, unadulterated autumn bliss. Seriously, it’s like a cozy sweater in bar form, and trust me, you’re gonna want to make these Cranberry Orange Fall Bars *all* season long.
I stumbled upon this recipe a few years back when I was *desperate* for a Thanksgiving dessert that wasn’t the usual pumpkin pie. I wanted something easy, something different, and something that screamed “FALL!” These bars delivered, big time! Now, they’re a must-have for every gathering. They’re sweet, tart, a little bit crumbly, and seriously addictive. Plus, the combination of cranberry and orange? Pure magic. You’ll see!
So, get ready to bake some serious deliciousness. These bars are easy enough for a weeknight treat, but fancy enough to impress your friends and family. Let’s get started!
Ingredients for Delicious Cranberry Orange Fall Bars
Alright, before we dive into the fun part, let’s make sure we have all the goodies. Don’t worry, the ingredient list is pretty straightforward. You probably have most of it already! Here’s what you’ll need:
- 1 cup of all-purpose flour. Yup, just your regular, everyday flour.
- 1/2 cup of rolled oats. This will give our bars that lovely, slightly chewy texture.
- 1/2 cup of packed brown sugar. This is where the caramel-y goodness comes from!
- 1/2 cup (that’s one stick!) of cold, unsalted butter. Make sure it’s cold, cold, cold!
- 1/4 teaspoon of salt. Don’t skip this. It enhances all the other flavors.
- 1 cup of fresh cranberries. You can find these in the produce section, usually.
- 1/2 cup of granulated sugar. For that perfect balance of sweet and tart.
- 1/4 cup of orange juice. Freshly squeezed is always best (and smells amazing!), but store-bought works too.
- 1 tablespoon of orange zest. This is where the magic happens! It adds so much bright, citrusy flavor.
See? Nothing too crazy. Now, let’s get baking!
Equipment You’ll Need to Bake Cranberry Orange Fall Bars
Okay, before we get our bake on, let’s make sure we’ve got the right tools for the job. You don’t need a ton of fancy gadgets, I promise! Just a few basics, and you’ll be golden.
- A 9×9 inch baking pan. This is *super* important! It’s the perfect size for these bars.
- Mixing bowls. You’ll need at least two – one for the dry ingredients and one for the filling.
- A whisk or a fork. For mixing, of course!
- Measuring cups and spoons. Gotta get those ingredients just right!
- A pastry blender or a fork. For cutting the butter into the flour mixture. Or, you can use your fingers – get those hands dirty!
- A spatula or spoon. For spreading the filling and the topping.
- The oven, of course! Make sure it’s preheated and ready to go.
That’s it! Pretty simple, right? Honestly, you probably have all this stuff already. Now, let’s move on to the good stuff: the step-by-step instructions!
Step-by-Step Instructions: How to Make Cranberry Orange Fall Bars
Alright, friends, let’s get down to the nitty-gritty and actually *make* these amazing bars! Don’t worry, it’s super easy, and I’ll walk you through every single step. Just follow along, and you’ll be enjoying a delicious treat in no time!
Preparing the Crust for Your Cranberry Orange Fall Bars
First things first, we’ve gotta get that yummy crust ready. It’s the base of all the deliciousness, so let’s make it count!
- Grab a mixing bowl (one of those bowls you set aside earlier!).
- Toss in your flour, oats, brown sugar, and salt. Give it a quick whisk to make sure everything’s evenly distributed.
- Now, for the butter! This is where things get a little fun. You want that cold butter cut into the flour mixture until it looks like coarse crumbs. I like to use a pastry blender for this, but honestly, your fingers work just as well! Just pinch the butter into the flour until it’s all crumbly.
- Once you’ve got that crumbly texture, it’s time to press half of the mixture into the bottom of your 9×9 inch baking pan. I usually just use my fingers to press it down evenly.
And that’s it! Crust is done. Easy peasy, right?
Making the Cranberry Orange Filling
Next up, let’s whip up that vibrant, tangy, and oh-so-delicious cranberry orange filling! This is where the magic really happens, folks.
- In a separate bowl (yup, another one!), combine your chopped cranberries, granulated sugar, orange juice, and that zesty orange zest.
- Give it a good stir until everything’s nice and mixed together. You’ll notice the cranberries start to soften up a bit.
- That’s it! Filling is ready to go. See? I told you this recipe was easy!
The smell of that orange zest is already making my mouth water! Okay, next step…
Assembling and Baking Your Cranberry Orange Fall Bars
Now, let’s put it all together and get those bars baking! This part is a breeze.
- Pour that beautiful cranberry mixture evenly over the crust in your pan. Make sure it’s all nicely spread out.
- Next, sprinkle the remaining oat mixture (that crumbly stuff!) evenly over the top of the cranberry layer. Don’t be shy!
- Pop that pan into your preheated oven (350°F / 175°C).
- Bake for 30-35 minutes. You’ll know they’re done when the top is golden brown and the filling is bubbly.
Be careful when you take them out! Hot, hot, hot! Let them cool completely before we cut into them. This is the hardest part, I know, I know!
Cooling and Cutting Your Cranberry Orange Fall Bars
Patience, my friends, patience! Letting these bars cool completely is *super* important. Trust me on this one. If you cut them while they’re still warm, they’ll fall apart. Nobody wants that!
- Let the bars cool completely in the pan. This usually takes a couple of hours. I know, it’s torture.
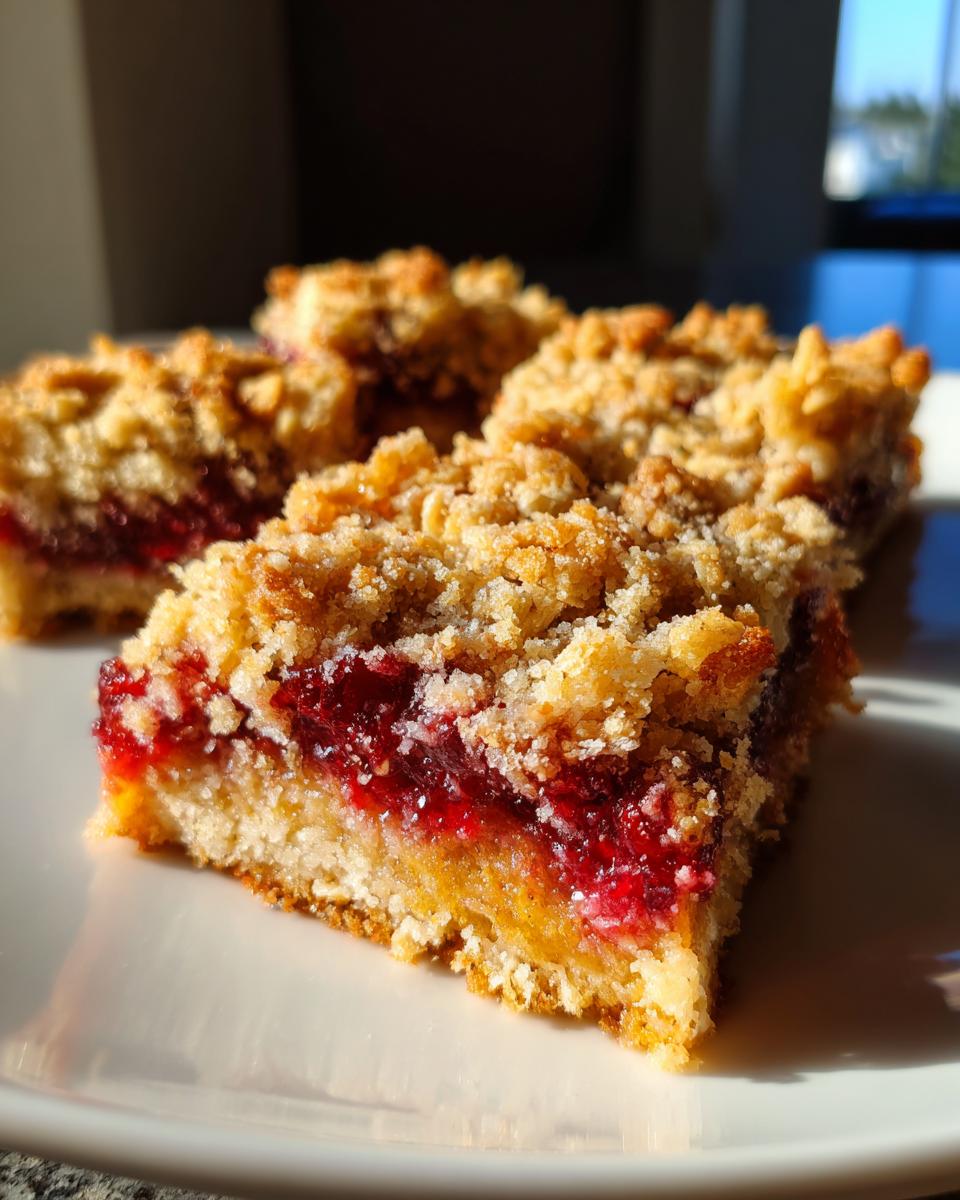
- Once they’re completely cool, you can cut them into bars. I like to use a sharp knife for nice, clean cuts.
- For extra-perfect bars, you can even line your pan with parchment paper, leaving some overhang. Then, once they’re cool, you can just lift them out and cut them on a cutting board!
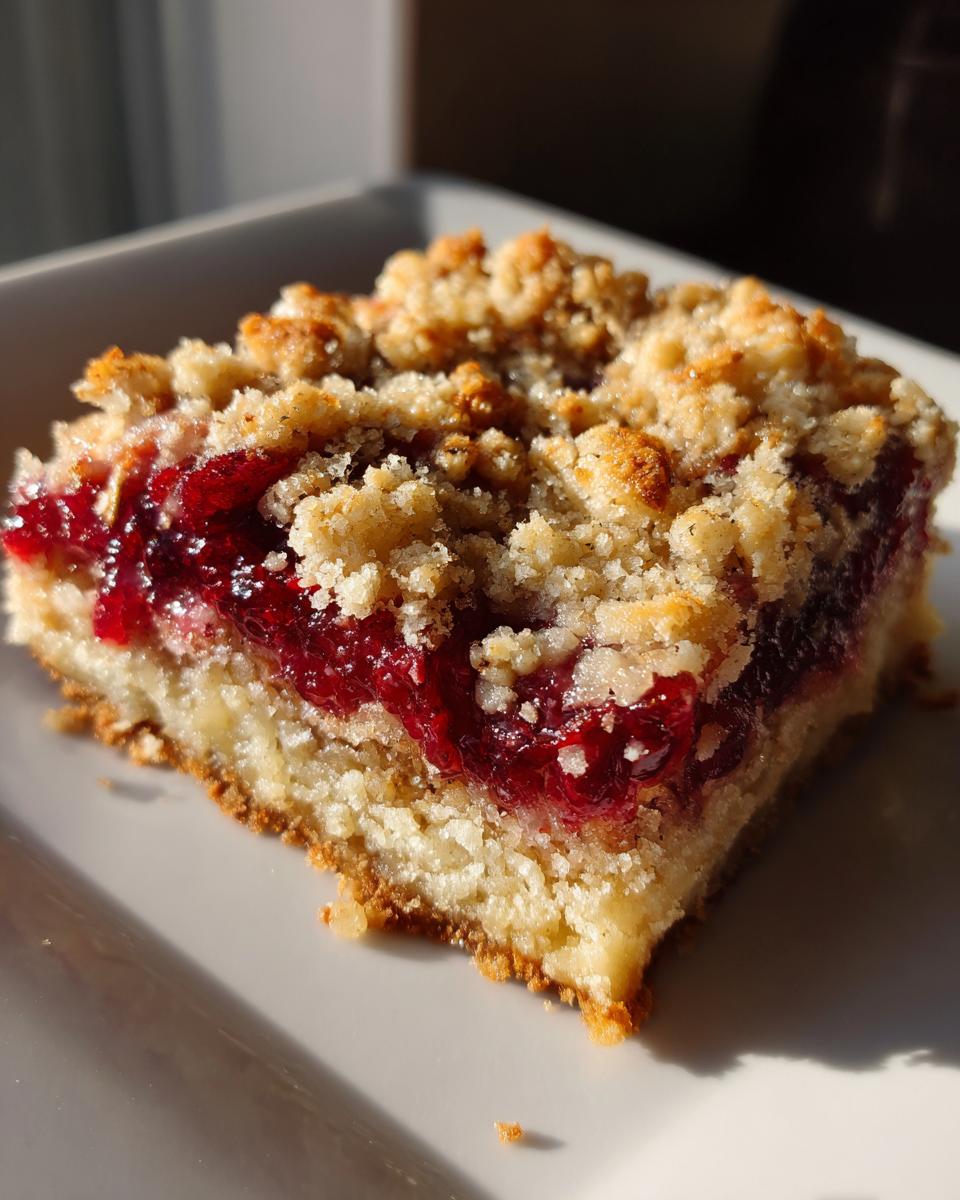
And that’s it! You’ve officially made a batch of amazing Cranberry Orange Fall Bars! Now, go on, treat yourself. You deserve it!
Why You’ll Love These Cranberry Orange Fall Bars
Okay, so why are these Cranberry Orange Fall Bars so darn amazing? Let me tell you! I could go on and on, but I’ll keep it short and sweet (just like the bars themselves!). Here’s why you’re gonna fall head over heels:
- Super Easy to Make! Seriously, even if you’re a beginner baker, you can totally handle this recipe. No fancy skills required!
- That Flavor Combo! The tart cranberries and bright orange zest are a match made in heaven. It’s the perfect balance of sweet and tangy.
- Perfect for Fall! These bars just *scream* autumn. They’re perfect for Thanksgiving, Halloween, or any cozy fall gathering.
- Make-Ahead Friendly! You can totally make these bars a day or two in advance. They actually get even better as the flavors meld together!
- Crowd-Pleaser! These bars are always a hit. Everyone loves them, and they’re perfect for sharing (or not sharing, I won’t judge!).
- Delicious Texture! You get a buttery, crumbly crust topped with a gooey, fruity filling, and a crunchy oat topping. Texture is everything, my friends!
Honestly, what’s not to love? They’re easy, delicious, and perfect for any occasion. Seriously, go make them! You won’t regret it!
Ingredient Notes and Possible Substitutions
Okay, let’s talk about the stars of the show and what you can do if you’re missing something. Baking is all about having fun, so don’t stress if you need to make a few tweaks! Here’s the lowdown on the ingredients and some easy swaps:
- Cranberries: Okay, so fresh cranberries are *amazing* in these Cranberry Orange Fall Bars, but if you can’t find them, don’t panic! You can totally use frozen cranberries. Just make sure you don’t thaw them before using them. You can add them straight from the freezer to the recipe. They might release a bit more liquid, so you might need to bake them for a couple of extra minutes.
- Orange Juice: Freshly squeezed orange juice is, of course, the best. It gives the bars that extra zing. But if you’re in a pinch, store-bought orange juice works just fine! Just make sure it’s 100% orange juice – no added sugar or anything weird.
- Orange Zest: This is where a lot of the flavor comes from! If you don’t have an orange, you can try using a teaspoon of orange extract instead. The flavor won’t be *exactly* the same, but it’ll still give you that lovely citrusy kick!
- Butter: I always use unsalted butter in my baking. This way, I can control the amount of salt. But if you only have salted butter on hand, it’s totally okay! Just reduce the amount of salt you add to the crust a little bit. Trust me, it’ll still be delicious!
- Flour: All-purpose flour is what I recommend, but if you want to get fancy, you could try using a blend of all-purpose and a little bit of whole wheat flour for a nuttier flavor.
- Brown Sugar: I love the depth of flavor that brown sugar gives to these bars, but you could totally use granulated sugar if that’s all you have. The bars will still be super yummy!
See? Don’t be afraid to experiment a little! These Cranberry Orange Fall Bars are pretty forgiving. The most important thing is to have fun and enjoy the process!
Tips for Success: Perfecting Your Cranberry Orange Fall Bars
Okay, you’ve got the recipe, you’ve got the ingredients, now let’s make sure those Cranberry Orange Fall Bars are absolutely *perfect*! I’ve learned a few things over the years (and a few burnt batches, let’s be honest!) so here are my pro tips to help you get the best results, every single time:
- Chill Out the Butter! Seriously, this is key! Make sure your butter is *cold* when you’re cutting it into the flour mixture for the crust. This helps create those little pockets of air that make the crust perfectly crumbly. If your butter is too warm, you’ll end up with a tough, flat crust.
- Don’t Overmix! When you’re making the crust, stop mixing as soon as the mixture resembles coarse crumbs. Overmixing develops the gluten in the flour, which will make the crust tough. We want crumbly, not tough!
- Zest Before You Juice! Trust me on this one! It’s so much easier to zest your orange *before* you juice it. That way, you’re not trying to zest a slippery, juicy orange. Plus, you get all the zest, and none of the mess!
- Fresh is Best (But Frozen Works)! While fresh cranberries are amazing, don’t let a lack of fresh ones stop you! Frozen cranberries work just as well. Just don’t thaw them before using – add them straight from the freezer.
- Watch That Oven! Ovens can be sneaky! Keep an eye on your bars while they’re baking, especially towards the end. Every oven is a little different, so the baking time might vary. You want the top to be a beautiful golden brown.
- Cool Completely! I know, it’s torture, but let those bars cool completely before you cut them. This allows the filling to set and prevents them from falling apart. Trust me, it’s worth the wait!
- Use a Sharp Knife! For clean, beautiful cuts, use a sharp knife. Wipe the knife clean between each cut for the best results.
- Line Your Pan! For super easy removal, line your baking pan with parchment paper, leaving an overhang on the sides. Once the bars are cool, you can just lift them out!
Follow these tips, and you’ll be on your way to Cranberry Orange Fall Bar perfection! Happy baking, friends!
Frequently Asked Questions About Cranberry Orange Fall Bars
Okay, I know you’re probably bursting with questions, and I’m here to help! Here are a few of the most frequently asked questions about these Cranberry Orange Fall Bars. Hopefully, this answers everything!
Can I use different types of flour?
Sure, you can experiment a bit! I usually use all-purpose flour, but you could try using a blend of all-purpose and whole wheat flour. The whole wheat will give the bars a slightly nuttier flavor and a little more texture. You could also try a gluten-free blend, but you might need to adjust the amount of liquid a bit, so they don’t dry out. Just remember, different flours absorb liquids differently. So, keep an eye on your batter!
How do I store these bars?
These bars are super easy to store! Just let them cool completely, then cut them into squares. Store them in an airtight container at room temperature. They’ll stay fresh and delicious for about 3 days. If you want to keep them longer, you can always freeze them!
Can I make these bars ahead of time?
Absolutely! These Cranberry Orange Fall Bars are perfect for making ahead. You can make them a day or two in advance, store them in an airtight container, and they’ll be even *more* delicious! The flavors meld together beautifully over time. Just make sure to let them cool completely before cutting and storing.
Can I freeze these bars?
Yes, you can definitely freeze these bars! Once they’re completely cool, cut them into squares, wrap them individually in plastic wrap, and then place them in a freezer-safe bag or container. They’ll keep in the freezer for up to 2 months. When you’re ready to enjoy them, just let them thaw at room temperature. You can even enjoy them straight from the freezer for a super-refreshing treat! They’re great either way!
I hope that answers all your burning questions. Happy baking, everyone!
Serving Suggestions for Your Cranberry Orange Fall Bars
Alright, you’ve baked these amazing Cranberry Orange Fall Bars. Now, how to serve them? Well, let me tell you, the possibilities are endless! But here are a few of my favorite ways to enjoy these little bites of heaven.
- With a Cup of Coffee: Seriously, it’s a match made in heaven! The tartness of the cranberries and the sweetness of the bars go perfectly with a strong cup of coffee. It’s the perfect way to start your day or to enjoy an afternoon treat.
- With a Pot of Tea: If coffee isn’t your thing, a warm cup of herbal tea is just as good. A nice, soothing herbal tea, like chamomile or peppermint, is a great pairing!
- With a Scoop of Vanilla Ice Cream: Okay, this is a bit of a splurge, but trust me, it’s worth it! The warm bars, the cool ice cream…it’s the ultimate dessert experience. The vanilla ice cream really complements the flavors of the cranberries and oranges.
- As a Dessert at a Gathering: These bars are perfect for sharing! They’re easy to transport, easy to eat, and everyone loves them. Bring them to a potluck, a party, or just a get-together with friends and family. They’re guaranteed to be a hit.
- On Their Own! Honestly, these bars are delicious all on their own! They’re the perfect grab-and-go treat. Enjoy them as a snack, a dessert, or whenever you’re craving something sweet and delicious.
No matter how you choose to serve them, these Cranberry Orange Fall Bars are sure to be a hit! So go ahead, get creative, and enjoy!
Storage and Reheating Instructions
So, you’ve baked a batch of these glorious Cranberry Orange Fall Bars, and you’ve got leftovers? (If so, congrats! That means you didn’t eat them all in one sitting, which, honestly, is a feat of willpower!). Now, let’s talk about how to keep those bars fresh and delicious for as long as possible.
Storage is Key!
The best way to store your leftover Cranberry Orange Fall Bars is in an airtight container. A good, sturdy container is your best friend here! You can use a plastic container with a lid, a glass container, or even a ziplock bag. Just make sure it’s sealed up tight to keep those bars from drying out. They’ll stay fresh at room temperature for about 3 days. But, if it’s super warm where you live, you might want to pop them in the fridge to be safe.
How Long Will They Last?
If you store them properly, your Cranberry Orange Fall Bars should stay delicious for about 3 days at room temperature. After that, they might start to dry out a bit. But hey, they’re so yummy, I doubt they’ll last that long anyway!
Can You Freeze Them?
Absolutely! These bars freeze beautifully. Once they’re completely cooled, cut them into squares. Then, wrap each bar individually in plastic wrap. This is super important to prevent freezer burn. After that, pop them into a freezer-safe bag or container. They’ll keep in the freezer for up to 2 months. That way, you can enjoy the deliciousness whenever you want!
Reheating Instructions!
If you want to warm up your bars a bit, you can totally do that! If you’ve got them in the fridge, you can let them come to room temperature or pop them in the microwave for a few seconds. If they’re frozen, you can let them thaw at room temperature. You can even warm them up in the oven at a low temperature for just a few minutes. Just be careful not to overdo it, or they’ll dry out! Honestly, though, these Cranberry Orange Fall Bars are delicious at any temperature. So, enjoy!
And there you have it! All the tips and tricks you need to store and reheat your Cranberry Orange Fall Bars. Now go forth, bake, and enjoy!
Estimated Nutritional Information
Alright, so I’m not a nutritionist, and I don’t have a fancy lab to test these Cranberry Orange Fall Bars, but I can give you a *rough* estimate of the nutritional info. Keep in mind, this is just a guess! It’s based on the ingredients, the serving size, and some basic calculations. But hey, it’ll give you a general idea!
So, for one bar (assuming you cut them into about 16 pieces), here’s what you can *roughly* expect:
- Calories: Around 200.
- Sugar: About 20 grams. (Yeah, there’s sugar in there, but it’s worth it, trust me!)
- Sodium: Roughly 50 milligrams.
- Fat: About 8 grams.
- Saturated Fat: Around 5 grams.
- Unsaturated Fat: About 3 grams.
- Trans Fat: Zero, baby!
- Carbohydrates: About 30 grams.
- Fiber: Around 2 grams.
- Protein: About 2 grams.
- Cholesterol: Around 20 milligrams.
Again, take these numbers with a grain of (you guessed it!) salt. It’s just an estimate! But hopefully, it gives you a general idea of what you’re getting into. And hey, even if it’s a little higher than expected, remember: everything in moderation! And these Cranberry Orange Fall Bars? Totally worth it! Happy Baking!
For more delicious recipes and inspiration, check out my Pinterest!
Print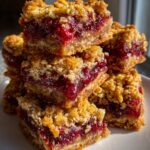
**4-Step Cranberry Orange Fall Bars: So Good!**
- Total Time: 55 minutes
- Yield: 16 bars
- Diet: Vegetarian
Description
Delicious cranberry orange fall bars. Perfect for any occasion.
Ingredients
- 1 cup all-purpose flour
- 1/2 cup rolled oats
- 1/2 cup packed brown sugar
- 1/2 cup (1 stick) cold unsalted butter, cut into cubes
- 1/4 teaspoon salt
- 1 cup fresh cranberries, chopped
- 1/2 cup granulated sugar
- 1/4 cup orange juice
- 1 tablespoon orange zest
Instructions
- Preheat oven to 350°F (175°C).
- In a bowl, combine flour, oats, brown sugar, and salt.
- Cut in butter until mixture resembles coarse crumbs.
- Press half of the mixture into a 9×9 inch baking pan.
- In a separate bowl, combine cranberries, sugar, orange juice, and zest.
- Spread cranberry mixture over the crust.
- Crumble remaining oat mixture over the cranberry layer.
- Bake for 30-35 minutes.
- Let cool completely before cutting into bars.
Notes
- For a sweeter bar, add more sugar to the cranberry filling.
- Use a parchment paper sling for easy removal.
- Store bars in an airtight container for up to 3 days.
- Prep Time: 20 minutes
- Cook Time: 35 minutes
- Category: Dessert
- Method: Baking
- Cuisine: American
Nutrition
- Serving Size: 1 bar
- Calories: 200
- Sugar: 20g
- Sodium: 50mg
- Fat: 8g
- Saturated Fat: 5g
- Unsaturated Fat: 3g
- Trans Fat: 0g
- Carbohydrates: 30g
- Fiber: 2g
- Protein: 2g
- Cholesterol: 20mg


