

No heading needs to be written for the introduction.
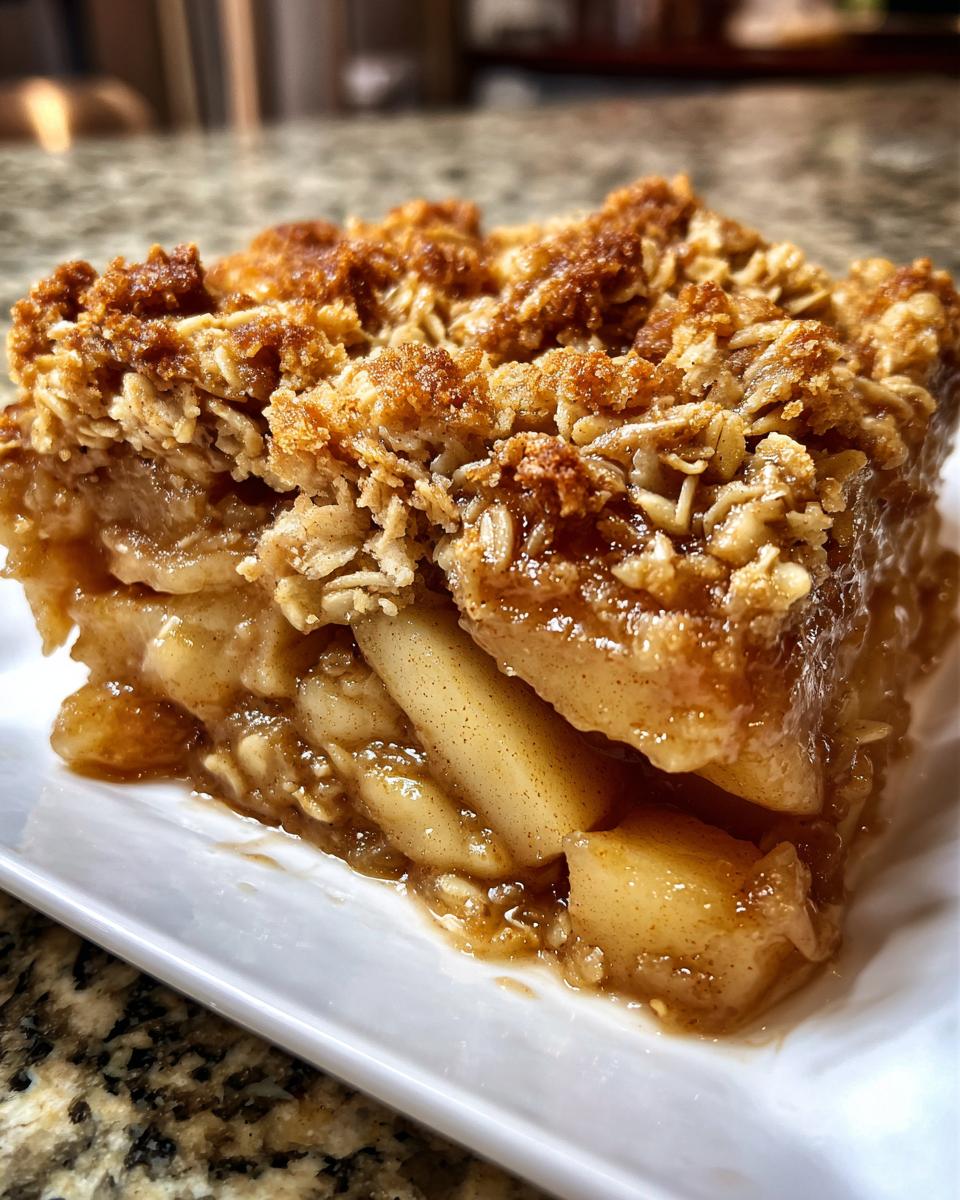
Okay, friends, let me tell you, is there anything better than the smell of an *apple crisp* baking in the oven on a chilly day? Seriously, it’s pure comfort food magic! Whenever I want to make my kitchen feel extra cozy, or if I just need a little hug in dessert form, I whip up my *Classic Apple Crisp with Cinnamon Oat Topping*. It’s seriously the best!
I’ve been making this recipe for years – it’s been a family favorite ever since my grandma shared it with me. The best part? It’s so easy! You don’t need any fancy equipment or crazy baking skills. This recipe is all about simple ingredients, simple steps, and a whole lot of deliciousness. I’m telling you, this isn’t just *good,* it’s *the best* apple crisp you’ll ever taste. Trust me, you’re going to love it! It’s the perfect balance of sweet, tart, and crunchy. And honestly? It’s the easiest dessert to make for any gathering, or just when you want a little something special.
Ingredients for a Delicious *Classic Apple Crisp with Cinnamon Oat Topping*
Alright, let’s talk ingredients! You won’t believe how simple this *Classic Apple Crisp* is. We’re talking pantry staples, plus some lovely fresh apples. But trust me, the quality of your ingredients makes all the difference. I’m going to break it all down for you, so you know exactly what to grab at the store.
Apples: The Heart of Your *Classic Apple Crisp*
First up, the star of the show: the apples! You’ll need about 6 cups of peeled and sliced apples. Now, here’s a little secret from me: don’t just use one type of apple! A mix is where it’s at. I love a blend of tart Granny Smiths (they hold their shape beautifully) with some sweeter Honeycrisps or Galas to balance things out. The variety gives you that perfect sweet-tart flavor combo. Remember, peeling is a must – no one wants tough apple skin in their crisp!
The Crispy Oat Topping Ingredients
Next, we move on to the topping, which is the CRUNCHY part of this equation. You’ll need 1 cup of all-purpose flour, 1 cup of rolled oats (not quick-cooking!), 1 cup of packed brown sugar (dark or light, your call!), 1/2 cup of cold, cubed butter (this is super important for that crumbly texture!), 1 teaspoon of ground cinnamon (the cozier the better!), and a pinch of salt. Make sure that butter is COLD! It’s the key to achieving that perfect, crisp topping.
Step-by-Step Instructions: Making Your *Classic Apple Crisp with Cinnamon Oat Topping*
Okay, friends, this is the fun part! Don’t you worry, it’s super easy, and I’ll walk you through every single step. Just follow along, and you’ll have a warm, bubbly *apple crisp* in no time. This is where the magic happens, so let’s get baking!
Preparing the Apples
First things first: preheat your oven to 375°F (190°C). Then, grab your peeled and sliced apples and toss them with a little bit of cinnamon – just a dash, maybe a teaspoon or so. You want them lightly coated. Next, put those cinnamon-kissed apples into your baking dish. You can use a 9×13 inch dish, or whatever you have on hand. Just make sure it’s big enough to hold all those delicious apples!
Creating the Cinnamon Oat Topping
Now, let’s make that amazing topping! In a bowl, combine your flour, oats, brown sugar, more of that yummy cinnamon (another teaspoon is perfect!), and a pinch of salt. Whisk it all together. Next, grab your cold, cubed butter. This is key: use your fingers or a pastry blender to cut the butter into the dry ingredients until the mixture is crumbly. You want it to look like coarse sand. It’s a little bit of work, but trust me, it’s worth it for that perfect crispiness! Once it’s all crumbly, evenly sprinkle that beautiful topping over your apples. Don’t be shy!
Baking and Cooling Your *Classic Apple Crisp*
Time to bake! Pop your *apple crisp* into the preheated oven and let it bake for about 30-40 minutes. You’ll know it’s done when the apples are tender and bubbly, and the topping is a gorgeous golden brown. Keep an eye on it, though – every oven is a little different! Once it’s done, take it out and let it cool for at least 15-20 minutes before serving. I know, I know, it’s hard to wait, but the *apple crisp* will set up a bit as it cools. Plus, you don’t want to burn your tongue!
Why You’ll Love This *Classic Apple Crisp with Cinnamon Oat Topping*
So, why is this *Classic Apple Crisp* a winner? Oh, let me count the ways! First off, it’s seriously easy. Like, ridiculously easy. Even if you’re a beginner baker, you can totally nail this. You’ll feel like a pro!
- It’s pure comfort food bliss! Warm apples, a crispy topping… what’s not to love?
- The flavor is out of this world! Sweet, tart, cinnamon-y perfection.
- It’s perfect for any occasion. Weeknight dessert? Holiday gathering? This *apple crisp* is always a hit!
- Uses simple ingredients you probably already have! No need for a special trip to the store.
Honestly? Baking this *apple crisp* is a cozy experience. The smell alone is enough to make you feel all warm and fuzzy inside. It’s a hug in a baking dish, I swear!
Tips for a Perfect *Classic Apple Crisp with Cinnamon Oat Topping*
Okay, so you want to take your *apple crisp* game to the next level? I’ve got a few little tricks up my sleeve that’ll make your *Classic Apple Crisp* absolutely perfect every single time. First off, really pay attention to your apples! That mix of varieties is key, but make sure they’re not too soft or they’ll turn to mush. Firm, crisp apples will hold their shape better during baking.
Next: the topping. Don’t overmix it! You want that crumbly texture, so use your fingers or a pastry blender, and work quickly. If your topping seems dry, add a tiny bit more cold butter. And here’s a little secret: if your topping is browning too fast, loosely tent the *apple crisp* with foil for the last few minutes of baking. Problem solved! See? Easy peasy!
Variations on the *Classic Apple Crisp* Theme
Okay, so you’ve mastered the *Classic Apple Crisp*? Amazing! But the fun doesn’t stop there, my friends! That’s the beauty of baking – you can totally customize this recipe to your own taste. Want to get creative? Here are some ideas to get your wheels turning!
First, let’s talk spices. While cinnamon is a classic, you can totally experiment! Try adding a pinch of nutmeg, cloves, or even a little bit of cardamom for a warm, spiced flavor. You could also sprinkle in some chopped nuts to the topping. Pecans and walnuts are my personal faves, but almonds are delish too! Or, if you want something a little different, toss in some cranberries or other fruits along with the apples. Think blueberries, raspberries, or even a mix of pears and apples! Yum!
Serving Suggestions for Your *Classic Apple Crisp*
Okay, you’ve baked your *apple crisp*, and it smells AMAZING. Now, the best part: serving it! Seriously, you can’t go wrong here. My absolute favorite way to enjoy this *Classic Apple Crisp* is warm, right out of the oven, with a big scoop of vanilla ice cream. The cold ice cream melting over the warm, bubbly apples and crispy topping? Pure heaven!
If you’re feeling fancy, a dollop of whipped cream or a drizzle of caramel sauce would be amazing too! Or, if you want something to drink alongside, a cup of hot apple cider or a cozy mug of spiced tea is a perfect pairing. Honestly, though? This *apple crisp* is so good, it’s perfect all on its own!
Storage and Reheating Instructions for Your *Apple Crisp*
Okay, so you made a big ol’ *apple crisp*, and there are leftovers? Lucky you! First things first, let that *apple crisp* cool completely. Then, just cover it tightly with plastic wrap or, even better, pop it into an airtight container. Pop it in the fridge, where it’ll be good for about 3-4 days.
When you’re ready to enjoy it again, you have a few options for reheating! My favorite way is in the oven. Just put a serving in a baking dish and bake at 350°F (175°C) until it’s warmed through and the topping is nice and crispy again. Or, if you’re in a hurry, you can use the microwave! Just be careful not to overdo it, or the topping might get a little soggy. Don’t worry, it’ll still taste amazing!
Frequently Asked Questions about *Classic Apple Crisp with Cinnamon Oat Topping*
Okay, I get it – you’ve got questions! And that’s totally cool because I’ve probably already thought of them myself. So, here are a few of the most common questions I get about my *Classic Apple Crisp with Cinnamon Oat Topping*, along with some helpful answers. Hopefully, this clears up any baking mysteries!
Can I use frozen apples?
Hmm, that’s a good one! You *can* use frozen apples in a pinch, but I wouldn’t recommend it. They tend to release a lot of extra liquid when they thaw, which could make your *apple crisp* a bit soggy. Fresh apples are really the way to go for the best results, but if you’re in a pinch, just be sure to drain off any excess liquid before you add the topping.
What if I don’t have rolled oats?
No rolled oats? No problem! You can use quick-cooking oats instead, but your topping texture will be a little different. It won’t be quite as chewy and might be a little less crispy. You could also try using a mix of rolled oats and some other grains like wheat flakes or even a little bit of granola for a fun twist!
Can I make it gluten-free?
Absolutely! To make this *Classic Apple Crisp* gluten-free, just swap out the all-purpose flour in the topping for a gluten-free all-purpose flour blend. Make sure it contains xanthan gum for the best texture. You might also want to double-check that your rolled oats are certified gluten-free, just to be safe. Easy peasy!
Can I make it ahead of time?
Yes, you can totally make this *apple crisp* ahead of time! You can assemble the whole thing, cover it, and store it in the refrigerator for up to a day before baking. Just add a few extra minutes to the baking time when you’re ready to bake it. Or, you can bake it completely and then reheat it later. Either way, it’s a great make-ahead dessert!
Estimated Nutritional Information for *Classic Apple Crisp with Cinnamon Oat Topping*
Okay, so you’re curious about the nitty-gritty details, right? I get it! While I don’t have a lab, I can give you an *estimated* nutritional breakdown for a single serving of my *Classic Apple Crisp*. Keep in mind that these numbers are just a rough guide, and they can vary a bit depending on the specific ingredients you use and the brands you choose. But, here’s what you can generally expect!
I wish I could tell you the exact numbers, but it’s always best to calculate it yourself! You will find many apps online that are able to provide you with a good estimate.

If you’re looking for more cozy dessert ideas, check out my cozy baking dessert recipes.
For more inspiration and delicious recipes, follow me on Pinterest.

Best *Classic Apple Crisp*: 1 Easy Delight
- Total Time: 1 hour
- Yield: 8 servings
- Diet: Vegetarian
Description
A comforting dessert with sweet apples and a crispy oat topping.
Ingredients
- 6 cups peeled and sliced apples
- 1 cup all-purpose flour
- 1 cup rolled oats
- 1 cup packed brown sugar
- 1/2 cup butter, cold and cubed
- 1 teaspoon ground cinnamon
- 1/4 teaspoon salt
Instructions
- Preheat oven to 375°F (190°C).
- Toss apples with a little cinnamon in a baking dish.
- Combine flour, oats, brown sugar, cinnamon, and salt.
- Cut in butter until mixture is crumbly.
- Sprinkle topping over apples.
- Bake for 30-40 minutes, or until apples are tender and topping is golden.
- Let cool slightly before serving.
Notes
- Serve warm with vanilla ice cream.
- Use a mix of apple varieties for best flavor.
- Adjust sweetness to your liking.
- Prep Time: 20 minutes
- Cook Time: 40 minutes
- Category: Dessert
- Method: Baking
- Cuisine: American
Nutrition
- Serving Size: 1 serving
- Calories: 300
- Sugar: 25g
- Sodium: 100mg
- Fat: 12g
- Saturated Fat: 7g
- Unsaturated Fat: 4g
- Trans Fat: 0g
- Carbohydrates: 48g
- Fiber: 5g
- Protein: 3g
- Cholesterol: 25mg


