
Alright everyone, gather ’round because I’ve got something truly special for you today – my absolute favorite Christmas Oreo Balls! Seriously, these little bites of heaven are the easiest, most delicious holiday treat you’ll whip up all season. Forget about turning on the oven; we’re going totally no-bake here, which means less stress and more time for sipping hot cocoa and watching those cheesy holiday movies. I remember the first time I made these, it was a total last-minute scramble before a cookie exchange, and they were an instant hit! They look so festive, taste like pure Christmas magic, and honestly, they’re almost too cute to eat… almost. You’re going to love how simple they are and how much joy they bring to any holiday table.

Why You’ll Love These Christmas Oreo Balls
Seriously, what’s not to love about these little guys? They’re the ultimate crowd-pleaser, always disappearing faster than you can say “Santa is coming!” You get that amazing, rich chocolatey flavor with that classic Oreo crunch, all wrapped up in a super cute, festive package. Plus, they’re ridiculously easy to make, which is a lifesaver during the busy holiday season.
- They’re incredibly quick to whip up – perfect for when you need a last-minute treat!
- Everyone adores them; they’re a guaranteed hit at any party.
- They look absolutely stunning, like little edible Christmas ornaments!
- The taste is pure holiday bliss – rich, sweet, and oh-so-satisfying.
Easy No-Bake Christmas Oreo Balls
The best part? No oven required! These are the definition of simple. You just crush, mix, roll, dip, and decorate. It’s so straightforward, even the littlest helpers can get involved. This recipe is your secret weapon for delicious holiday treats without any baking stress.
Perfect for Holiday Gatherings
Whether you’re heading to a potluck, a cookie exchange, or just want to bring a smile to your family’s faces, these Oreo balls are your go-to. They make fantastic edible gifts too! Package them up in little festive tins, and you’ve got a thoughtful, handmade present that everyone will appreciate.
Gathering Your Christmas Oreo Balls Ingredients
Alright, let’s get down to business and talk about what you’ll need to make these fantastic Christmas Oreo Balls. Don’t worry, it’s a pretty short and sweet list, which is part of why I love them so much! You’ll want to make sure your cream cheese is *fully* softened – I usually leave mine on the counter for at least an hour before I start. Trust me, this makes a HUGE difference in getting a smooth, well-combined mixture. And for the Oreos, just grab a standard package; we’re going to crush them up into fine crumbs, so the filling doesn’t really matter, but classic chocolate Oreos are my go-to for that perfect flavor.
Core Components for Christmas Oreo Balls
Here’s the heart of our little holiday treats: You’ll need about 24 standard Oreo cookies, crushed super fine. Then, we’ve got 8 ounces of cream cheese, making sure it’s nice and soft. For the coating, grab 1 1/2 cups of semi-sweet chocolate chips and about 1 tablespoon of vegetable shortening. The shortening is key for getting that super smooth, glossy finish on your chocolate. It really makes all the difference!
Decorative Elements for Holiday Sprinkled Oreo Cookie Balls
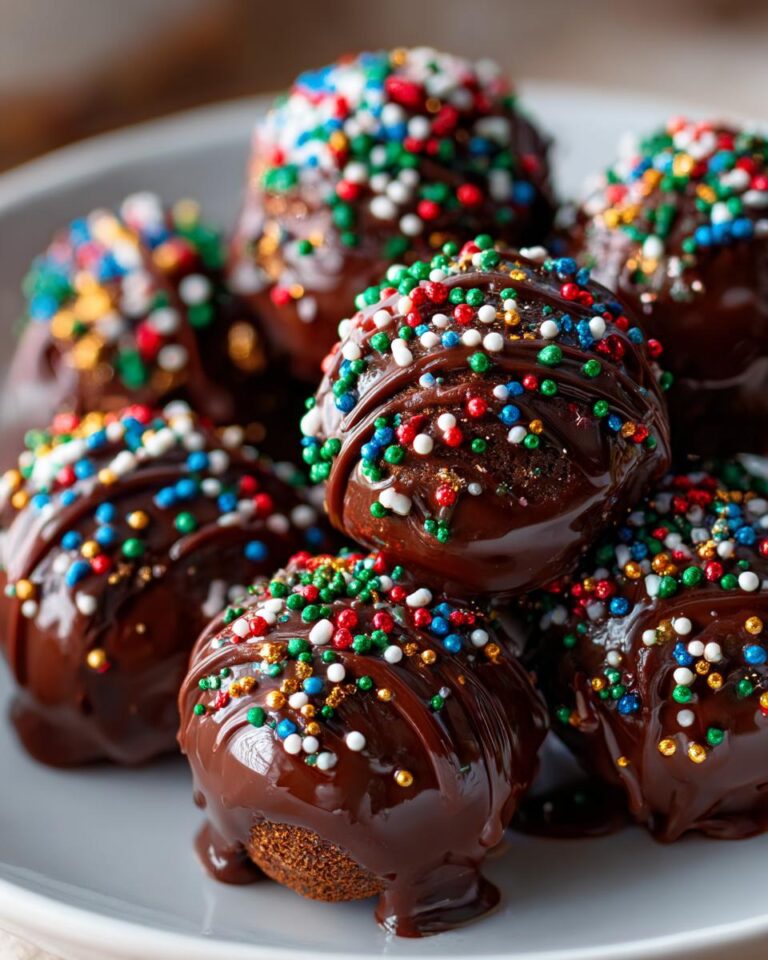
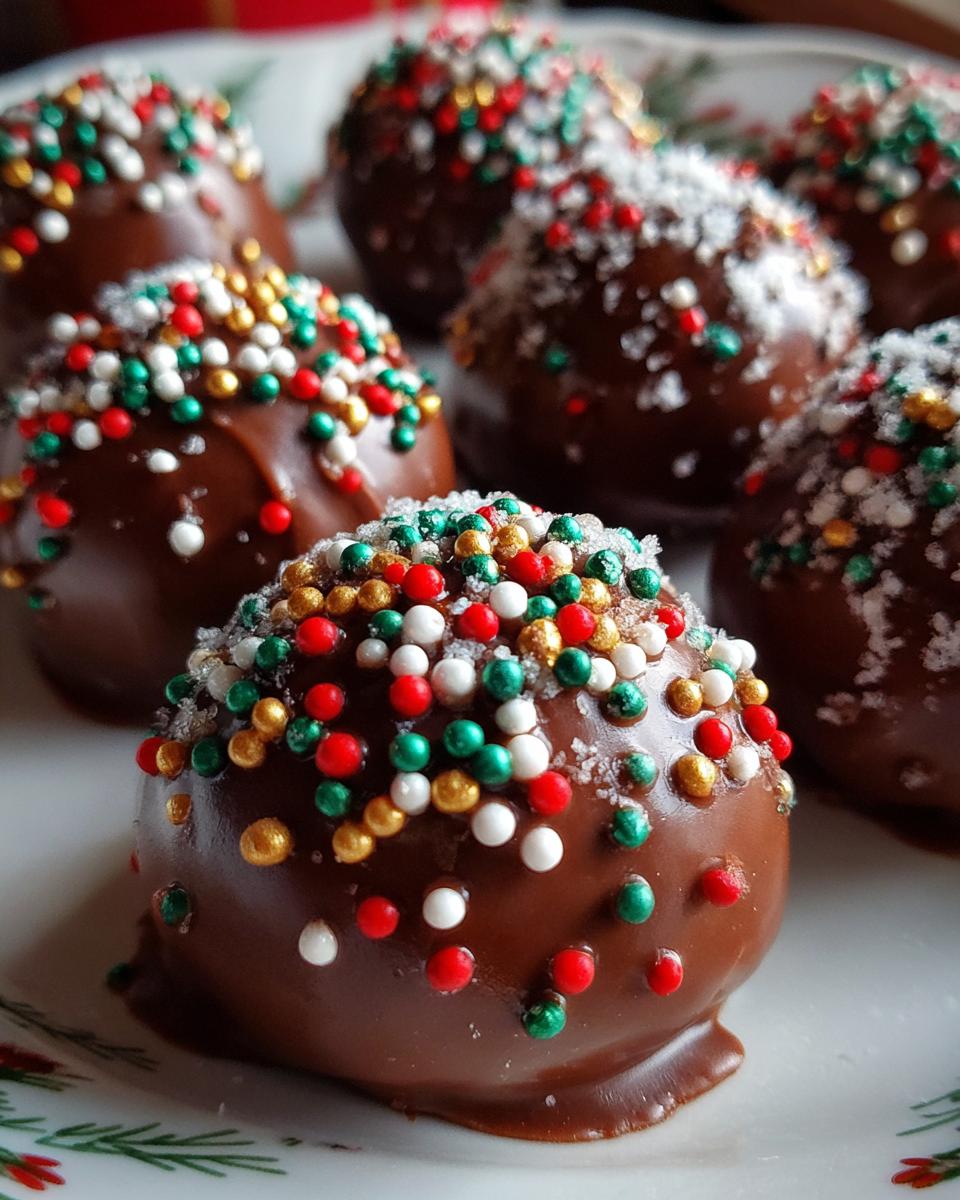
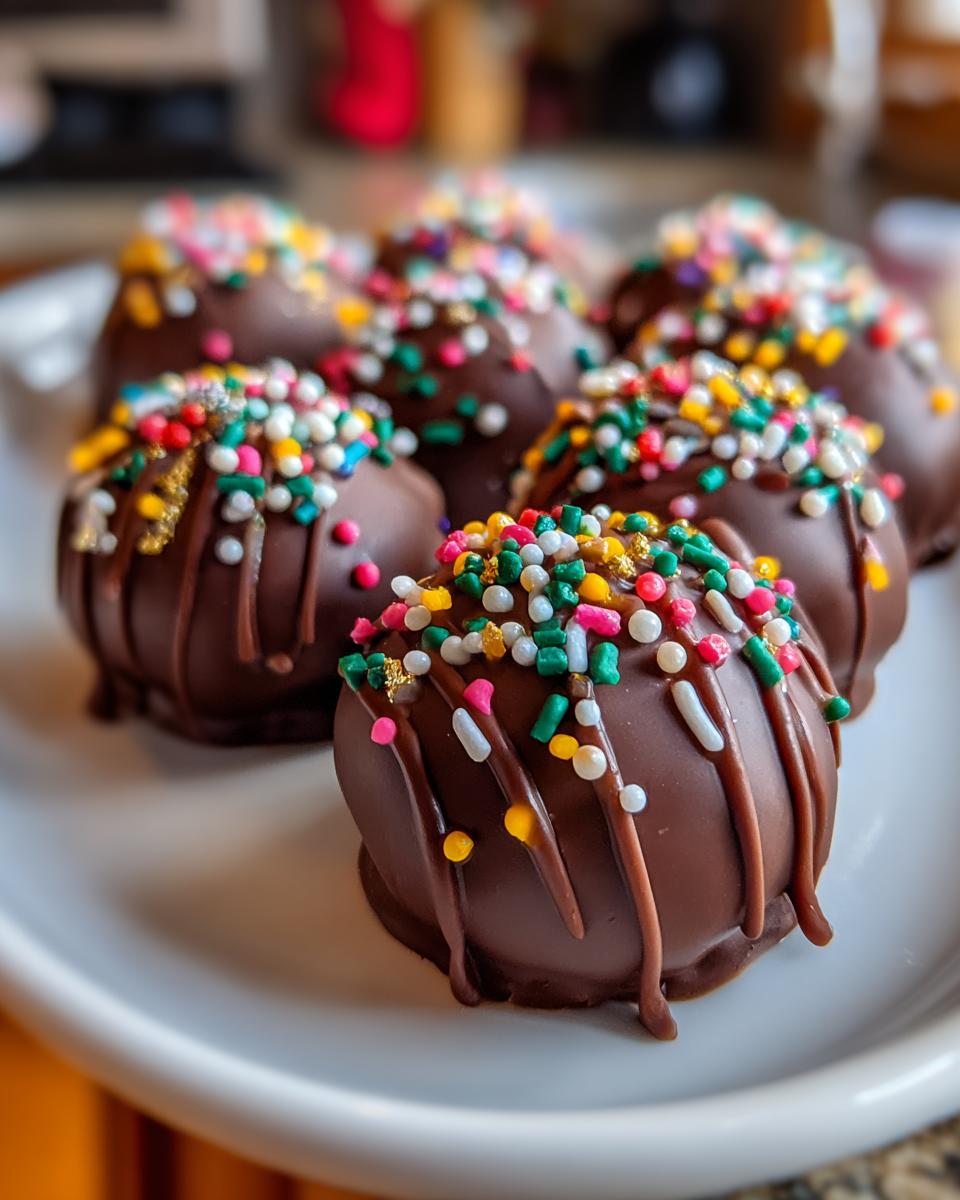
Now for the fun part – making them festive! You’ll want a good amount of Christmas sprinkles. I like to use a mix – some jimmies, some nonpareils, maybe even some fun shapes if you can find them! The goal here is to add that pop of holiday color right after you dip them, so have them ready to go. The more festive, the better, in my opinion!
Crafting Your Christmas Ornament Oreo Balls: Step-by-Step
Alright, get ready to make some magic happen! This is where the fun really begins. Don’t worry, I’ll walk you through every single step to make sure your Christmas Ornament Oreo Balls turn out absolutely perfect. It’s easier than you think, and the results are just *so* worth it!
Preparing the Oreo Base
First things first, we need to turn those Oreos into crumbs. You can totally use a food processor for this – it’s super fast and gets them nice and fine. If you don’t have one, just pop them into a sturdy zip-top bag, seal it up tight, and go to town with a rolling pin or even the bottom of a heavy pan. You want them to be like fine sand, not chunky bits. Once they’re all crumbly, dump them into a medium-sized bowl. Now, add in that softened cream cheese. This is where you really want to get your hands in there (or use a sturdy spoon or spatula) and mix it all together until there are no white streaks of cream cheese left. It should form a nice, thick dough. It might seem a little sticky, but that’s totally okay!
Shaping and Chilling the Christmas Oreo Balls
Now, it’s time to roll! Grab about a tablespoon of the Oreo and cream cheese mixture at a time and roll it between your palms to form little balls, about 1-inch in diameter. Try to make them as uniform as you can so they all bake and coat evenly. As you roll them, place them onto a baking sheet that you’ve lined with parchment paper. Parchment paper is your best friend here – it stops them from sticking! Once they’re all rolled, pop that whole baking sheet into the refrigerator for at least 30 minutes. This chilling step is super important because it firms up the balls, making them much easier to dip into the chocolate without falling apart.
Melting and Coating for Chocolate-covered Oreo Truffles
While those little guys are chilling, let’s get our chocolate ready. In a microwave-safe bowl, combine your semi-sweet chocolate chips and that tablespoon of vegetable shortening. Pop it in the microwave and heat it on 50% power for 30-second intervals, stirring really well after each one. Keep going until the chocolate is melted and super smooth and glossy. That little bit of shortening makes a world of difference in getting a nice, fluid coating that’s not too thick. If it seems a bit too thick even after melting, you can add just a tiny bit more shortening, like half a teaspoon, and stir it in well.
Decorating Your Holiday Sprinkled Oreo Cookie Balls
Okay, your Oreo balls should be nice and firm now, and your chocolate should be melted and smooth. Take one chilled ball at a time and carefully drop it into the melted chocolate. Use a fork or a dipping tool to gently coat the entire ball, letting any excess chocolate drip back into the bowl. Then, carefully lift the coated ball out and place it back onto your parchment-lined baking sheet. Here’s the crucial part for decoration: *immediately* sprinkle your Christmas sprinkles all over the top before the chocolate has a chance to set! Work quickly, because the chocolate hardens pretty fast.
Final Chill for Perfect Christmas Oreo Balls
Once all your balls are dipped and sprinkled, you’ve got one last step. Pop that baking sheet back into the refrigerator for at least another hour, or until the chocolate coating is completely firm. This final chill ensures that the chocolate is nice and set, so they hold their shape and are ready to be gobbled up. And there you have it – your beautiful, delicious Christmas Oreo Balls are ready to impress!
Tips for Perfect Christmas Oreo Balls
Making these little guys is super fun, but a few little tricks can make them even better. Trust me, I’ve learned a thing or two through trial and error! Following these tips will help ensure your Christmas Oreo Balls are not just delicious, but also look absolutely stunning on your holiday dessert table. They’re pretty forgiving, but these little pointers really elevate them from good to *wow*!
Achieving a Smooth Chocolate Coating
Okay, so the secret weapon for that super glossy, smooth chocolate coating is that little bit of vegetable shortening we added. Don’t skip it! It helps thin out the chocolate just enough so it coats the balls beautifully without being too thick. If your chocolate seems stubbornly thick even after melting, try adding just another half teaspoon of shortening. Microwave in 15-second bursts, stirring well each time. Also, make sure your chocolate isn’t too hot when you dip – let it cool just a touch after melting. This helps it set up nicely on the chilled Oreo balls.
Creative Decoration Ideas
Sprinkles are fantastic, but let’s get a little more creative! You can totally transform these into adorable Christmas Ornament Oreo Balls by adding a small loop of edible ribbon or a candy cane piece before the chocolate sets. For super cute Snowman Oreo Truffles, dip them in white chocolate, let them set, then use a little black edible marker or melted dark chocolate for eyes and buttons, and perhaps a tiny piece of candy corn for a nose! You can also drizzle contrasting chocolate colors over the top once the base coat has set for a fancy look. Think about red and green drizzles on white chocolate, or white chocolate zigzags on dark chocolate. They’re like little canvases for your holiday spirit! You can find more festive inspiration on Pinterest.
Frequently Asked Questions About Christmas Oreo Balls
Got questions about these festive little treats? I’ve got answers! These Christmas Oreo Balls are pretty straightforward, but sometimes little things pop up. Let’s clear them up so your holiday baking is totally stress-free!
Can I Make Christmas Oreo Balls Ahead of Time?
Oh, absolutely! This is one of my favorite things about these Xmas Desserts. You can totally make them a day or two in advance. Just make sure they’re fully chilled and the chocolate is firm. They actually taste even better after a day, as the flavors have a chance to meld together. Just keep them in an airtight container in the fridge until you’re ready to serve.
What if My Chocolate Doesn’t Coat Well?
Don’t you worry if your chocolate seems a bit thick or isn’t coating smoothly! The trick is that bit of shortening – it really helps. If it’s still too thick, you can add just a tiny bit more shortening, maybe half a teaspoon at a time, and stir it in well. Also, make sure your Oreo balls are good and chilled before dipping; a cold ball helps the chocolate set up faster. If the chocolate starts to get too firm in the bowl, just pop it back in the microwave for 10-15 seconds on low power to loosen it up again.
How Should I Store Leftover Christmas Oreo Balls?
Leftovers? What leftovers?! Just kidding! If, by some miracle, you have any of these Delicious Holiday Desserts left, store them in an airtight container in the refrigerator. They’ll stay fresh and delicious for up to a week. Just make sure the container is sealed tight to keep them from drying out or picking up any other fridge smells. They’re perfect for a little sweet treat anytime!
Understanding the Nutritional Value of Christmas Oreo Balls
Just a friendly heads-up, folks! The nutritional info for these delightful Christmas Oreo Balls is just an estimate. Since we all use different brands of Oreos, cream cheese, and chocolate chips, the exact numbers can wiggle around a bit. Think of this as a general guide – they’re a treat, and that’s the most important thing!
Print
Amazing Christmas Oreo Balls in 10 Minutes
- Total Time: 1 hour 30 minutes
- Yield: 24 balls
- Diet: Vegetarian
Description
Easy no-bake Christmas Oreo Balls covered in chocolate and decorated for the holidays. These festive treats are perfect for parties and cookie exchanges.
Ingredients
- 24 Oreo cookies
- 8 ounces cream cheese, softened
- 1 1/2 cups semi-sweet chocolate chips
- 1 tablespoon vegetable shortening
- Christmas sprinkles, for decorating
Instructions
- Crush Oreo cookies into fine crumbs.
- In a bowl, mix Oreo crumbs and softened cream cheese until well combined.
- Roll the mixture into 1-inch balls.
- Place balls on a baking sheet lined with parchment paper.
- Chill balls for at least 30 minutes.
- Melt chocolate chips and shortening in a microwave-safe bowl, stirring every 30 seconds until smooth.
- Dip each chilled ball into the melted chocolate, ensuring it’s fully coated.
- Place coated balls back on the parchment-lined baking sheet.
- Immediately add Christmas sprinkles before the chocolate sets.
- Refrigerate for at least 1 hour, or until the chocolate is firm.
Notes
- For a smoother chocolate coating, add a little more shortening.
- You can use milk or white chocolate instead of semi-sweet.
- Store leftovers in an airtight container in the refrigerator.
- Prep Time: 20 minutes
- Cook Time: 10 minutes
- Category: Dessert
- Method: No-Bake
- Cuisine: American
Nutrition
- Serving Size: 1 ball
- Calories: 150
- Sugar: 15g
- Sodium: 50mg
- Fat: 9g
- Saturated Fat: 5g
- Unsaturated Fat: 4g
- Trans Fat: 0g
- Carbohydrates: 15g
- Fiber: 0g
- Protein: 1g
- Cholesterol: 10mg


