
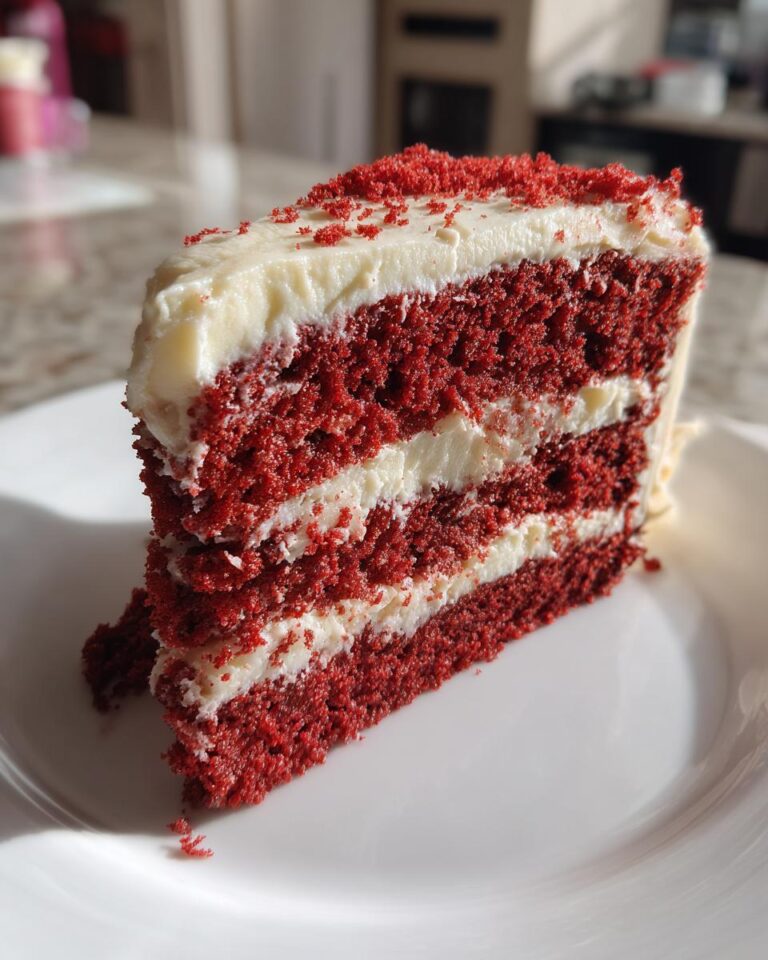
Hey there, fellow bakers! If you’re looking for a cake that’s going to knock your socks off, you’ve GOT to try my recipe for The Best Homemade Red Velvet Cake Ever. Seriously, I’ve been making this cake for years, and it’s always a hit. It’s so incredibly moist, with a rich, velvety texture that just melts in your mouth. And the flavor? Oh my goodness, it’s a perfect balance of sweet and tangy, thanks to that amazing cream cheese frosting!
I’m telling you, this red velvet cake is a showstopper. It’s perfect for Valentine’s Day, birthdays, or any special occasion where you want to impress. It’s a classic for a reason, and trust me, after you try this recipe, it’ll become a family favorite, just like it did in my house. I’ve tweaked and perfected this recipe over time, and I can’t wait to share all my secrets with you!
Ingredients for *The Best Homemade Red Velvet Cake Ever*
Alright, before we get baking, let’s talk ingredients! You’ll need a mix of dry and wet ingredients to make this red velvet magic happen. I always measure everything out beforehand – it makes the whole process so much smoother, trust me!
Dry Ingredients Breakdown
First up, we’ve got the dry stuff. You’ll need 2 1/2 cups of all-purpose flour, which gives the cake its structure. Then there’s 1 1/2 cups of granulated sugar for sweetness, a teaspoon each of baking soda and salt, and just a tiny teaspoon of unsweetened cocoa powder to enhance the chocolatey flavor. Don’t skip the salt; it balances everything out!
Wet Ingredients Explained
Now for the wet ingredients! You’ll need 1 cup of buttermilk (that’s the secret to the moistness!), 1 cup of vegetable oil, and 2 large eggs. Then comes the color: 2 tablespoons of red food coloring (I’ll give you a tip about this later!). And, finally, 2 teaspoons of white vinegar and 1 teaspoon of vanilla extract to round out the flavors.
Cream Cheese Frosting Ingredients
And of course, we can’t forget the frosting! For the dreamy cream cheese frosting, you’ll need 8 ounces of softened cream cheese (make sure it’s room temperature!), 1/2 cup (that’s one stick!) of softened unsalted butter, 4 cups of powdered sugar, and 1 teaspoon of vanilla extract. Get ready for the best frosting ever!
Step-by-Step Instructions: How to Bake *The Best Homemade Red Velvet Cake Ever*
Okay, so now for the fun part: actually baking this amazing The Best Homemade Red Velvet Cake Ever! Don’t be intimidated, because I’m going to walk you through every single step. Trust me, it’s easier than you think. Just follow along, and you’ll have a gorgeous cake in no time!
Preparing the Cake Pans
First things first, let’s get those cake pans ready. You’ll need two 9-inch round cake pans. Grab some cooking spray and give those pans a good coating. Then, sprinkle in some flour and tap the pans to make sure the flour coats the inside. Tip the pan upside down to get rid of the excess flour. This will keep your cake from sticking – super important!
Mixing the Dry Ingredients
In a large bowl, it’s time to get the dry ingredients mixed! Grab your whisk and give the flour, sugar, baking soda, salt, and cocoa powder a good whisking. Make sure everything is evenly combined. This step ensures that the baking soda is evenly distributed, which helps the cake rise perfectly.
Combining the Wet Ingredients
Now, in a separate bowl, whisk together all the wet ingredients. That’s the buttermilk, oil, eggs, red food coloring, vinegar, and vanilla extract. Whisk it until everything is nicely combined. Make sure you don’t skip the vinegar; it reacts with the baking soda to help the cake rise and gives it a little extra tang.
Combining Wet and Dry Ingredients
This is where the magic happens! Gradually add the wet ingredients to the dry ingredients, mixing on low speed with an electric mixer until just combined. Don’t overmix! Overmixing will develop the gluten and make the cake tough. A few streaks of flour are okay; we’re going for a tender crumb, not a workout.
Baking the Cake Layers
Pour the batter evenly into the prepared pans. Bake in a preheated oven at 350°F (175°C) for about 30-35 minutes. You’ll know the cakes are done when a toothpick inserted into the center comes out clean. Also, look for the edges to start pulling away from the sides of the pan. Careful, it splatters!
Cooling the Cake Layers
Once the cakes are out of the oven, let them cool in the pans for about 10 minutes. Then, carefully invert them onto a wire rack to cool completely. This will prevent them from getting soggy. Make sure they’re completely cool before you frost them, or the frosting will melt, and nobody wants that!
Making the Cream Cheese Frosting
While the cakes are cooling, it’s time to make the frosting! In a large bowl, beat the softened cream cheese and butter until smooth and creamy. Gradually add the powdered sugar, beating until combined. Then, stir in the vanilla extract. If it’s too thick, add a tiny bit of milk, one teaspoon at a time, until you reach your desired consistency.
Assembling and Frosting the Cake
Finally, the moment we’ve all been waiting for: assembling and frosting the cake! Place one cake layer on a serving plate or cake stand. Spread a generous layer of cream cheese frosting on top. Carefully place the second cake layer on top, and frost the top and sides of the cake. And there you have it – your very own The Best Homemade Red Velvet Cake Ever!
Why You’ll Love This Recipe for *The Best Homemade Red Velvet Cake Ever*
Okay, so why should you whip up this red velvet cake, like, right now? Let me tell you!
- It’s super quick and easy, even for beginner bakers.
- The flavor is absolutely incredible – a perfect balance of sweet and tangy.
- That cream cheese frosting? To die for!
- It’s a showstopper – perfect for any special occasion.
- It’s the ultimate comfort food that everyone will love!
Trust me, this cake is a winner!
Tips for Baking the Perfect *Homemade Red Velvet Cake*
Alright, so you want to make sure your Homemade Red Velvet Cake turns out absolutely perfect, right? I totally get it! I’ve learned a few tricks over the years that will help you avoid some common pitfalls and get that amazing result every time.
Achieving a Deep Red Color
First up, let’s talk color! If you really want that vibrant red, I highly recommend using gel food coloring. It’s much more concentrated than the liquid stuff and won’t thin out your batter. You’ll get a beautiful, deep color without changing the cake’s texture. Trust me on this one!
Ingredient Temperature Matters
Next, pay attention to your ingredients’ temperature. Make sure your eggs, buttermilk, and butter are all at room temperature. This helps them combine properly, creating a smooth batter that bakes evenly. It also makes for a lighter, fluffier cake. It’s a small step, but it makes a big difference, I swear!
Cake Layers Ahead of Time
And if you’re planning ahead, you can totally make the cake layers in advance! Just bake them, let them cool completely, then wrap them tightly in plastic wrap and freeze them. When you’re ready to assemble your Red Velvet Cake, simply thaw the layers in the fridge overnight. Easy peasy!
Variations for Your *Red Velvet Cake*
Okay, so you’ve got the basic recipe down, and it’s amazing. But, you know what? Sometimes, it’s fun to mix things up! This Red Velvet Cake is super versatile, and you can totally customize it to your liking. Don’t be afraid to get creative – that’s half the fun of baking, right?
Flavor Variations
Want to add a little extra something? Try adding a teaspoon of almond extract or a dash of cinnamon to the batter for a unique twist. You could also experiment with different extracts, like a tiny bit of peppermint for a holiday vibe. Yum!
Topping Ideas
While the cream cheese frosting is a classic, there are tons of other topping ideas. Fresh berries are always a winner. You could also add chocolate shavings, chopped nuts, or even a drizzle of white chocolate ganache for a truly decadent treat. Get creative!
Serving Suggestions for Your Delicious *Red Velvet Cake*
Okay, so you’ve baked this gorgeous Red Velvet Cake, and now it’s time to serve it! Honestly, it’s so good on its own, but a little something extra never hurts. I love to serve it with a scoop of vanilla ice cream – the contrast of warm cake and cold ice cream is amazing! Or, a simple cup of coffee or a glass of milk is the perfect pairing.
Storage and Reheating Instructions for *The Best Homemade Red Velvet Cake Ever*
So, you’ve made this amazing The Best Homemade Red Velvet Cake Ever, and you’ve got leftovers? Lucky you! Here’s the lowdown on how to keep your cake fresh and delicious.
Store leftover cake in an airtight container in the refrigerator. It’ll stay good for about 3-4 days. You can also freeze individual slices or the whole cake (well wrapped!) for up to a month. To reheat, let a slice come to room temperature, or warm it gently in the microwave for a few seconds. Easy peasy!
Estimated Nutritional Information for *The Best Homemade Red Velvet Cake Ever*
Alright, so you’re probably wondering about the nutritional info, right? I get it! Keep in mind, this is just an estimate, but it’s good to know what you’re getting yourself into. A single slice of this amazing cake usually clocks in around 450 calories, with about 25g of fat, 5g of protein, and 55g of carbs. Of course, that can vary a bit depending on your ingredients and how big those slices are!
Frequently Asked Questions about *Homemade Red Velvet Cake*
Okay, so before you dive into baking this Homemade Red Velvet Cake, I figured I’d answer a few questions that you might have. I get asked these all the time, so I thought I’d save you the trouble of wondering! I’m all about making baking as easy and fun as possible!
Can I substitute ingredients?
So, you might be wondering about substitutions. Listen, I get it – sometimes you’re missing an ingredient, or you want to make a healthier version. You *can* swap out the buttermilk for regular milk with a tablespoon of lemon juice or white vinegar (let it sit for 5 minutes). You can also try using a gluten-free flour blend. But honestly, for the best results, stick to the recipe as closely as possible!
How do I prevent the cake from sticking to the pan?
Ugh, nothing’s worse than a cake that sticks to the pan! But don’t worry, there are a few things you can do to prevent it. Make sure you grease and flour your pans *thoroughly*, as I mentioned earlier. You can also use parchment paper rounds on the bottom of the pans – that’s a lifesaver! And let the cakes cool in the pans for at least 10 minutes before inverting them.
How long will the cake last?
Well, if you somehow have leftovers, your Homemade Red Velvet Cake will last for about 3-4 days in the fridge, stored in an airtight container. You can also freeze it! Just wrap individual slices or the whole cake tightly in plastic wrap and then foil. It’ll keep in the freezer for up to a month. Just thaw it in the fridge overnight before serving!
For more baking inspiration, check out my Pinterest!
Print
Best Homemade Red Velvet Cake, Totally Unforgettable!
- Total Time: 1 hour 5 minutes
- Yield: 12 servings
- Diet: Vegetarian
Description
This is the best homemade red velvet cake ever. It is moist, delicious, and perfect for any occasion.
Ingredients
- 2 1/2 cups all-purpose flour
- 1 1/2 cups granulated sugar
- 1 teaspoon baking soda
- 1 teaspoon salt
- 1 teaspoon unsweetened cocoa powder
- 1 cup buttermilk
- 1 cup vegetable oil
- 2 large eggs
- 2 tablespoons red food coloring
- 2 teaspoons white vinegar
- 1 teaspoon vanilla extract
- Cream Cheese Frosting:
- 8 ounces cream cheese, softened
- 1/2 cup (1 stick) unsalted butter, softened
- 4 cups powdered sugar
- 1 teaspoon vanilla extract
Instructions
- Preheat oven to 350°F (175°C). Grease and flour two 9-inch round cake pans.
- In a large bowl, whisk together flour, sugar, baking soda, salt, and cocoa powder.
- In a separate bowl, whisk together buttermilk, oil, eggs, red food coloring, vinegar, and vanilla extract.
- Gradually add the wet ingredients to the dry ingredients, mixing until just combined.
- Pour batter into prepared pans and bake for 30-35 minutes, or until a toothpick inserted into the center comes out clean.
- Let cakes cool in pans for 10 minutes before inverting onto a wire rack to cool completely.
- Make the cream cheese frosting: In a large bowl, beat cream cheese and butter until smooth.
- Gradually add powdered sugar, beating until combined. Stir in vanilla extract.
- Once the cakes are cool, frost the top of one layer with frosting. Top with the second layer and frost the top and sides of the cake.
Notes
- For a deeper red color, you can use gel food coloring.
- Make sure your ingredients are at room temperature for the best results.
- You can make the cake layers ahead of time and freeze them.
- Prep Time: 30 minutes
- Cook Time: 35 minutes
- Category: Cake
- Method: Bake
- Cuisine: American
Nutrition
- Serving Size: 1 slice
- Calories: 450
- Sugar: 45g
- Sodium: 250mg
- Fat: 25g
- Saturated Fat: 15g
- Unsaturated Fat: 8g
- Trans Fat: 0g
- Carbohydrates: 55g
- Fiber: 1g
- Protein: 5g
- Cholesterol: 50mg


