
Oh my goodness, get ready for the cutest cookies you’ve ever seen! Thanksgiving is just around the corner, and you *have* to whip up these adorable Thanksgiving cookies shaped like little turkeys. Seriously, they’re so much fun to make and even more fun to gobble up. This recipe is a total lifesaver for holiday baking – it’s easy enough that even if you’re not a pro baker, you can totally nail it. Plus, who doesn’t love a festive treat that tastes as good as it looks? These aren’t just cookies; they’re edible art that’ll make your holiday table sing!
Why You’ll Love These Thanksgiving Cookies
Trust me, these aren’t just any cookies; they’re little bursts of holiday cheer! Here’s why you’ll be making these Thanksgiving cookies year after year:
- Super Easy to Decorate: Even if you’ve never decorated a cookie in your life, you can make these turkeys look amazing. It’s perfect for little helpers too!
- So Festive and Fun: They add such a cute, whimsical touch to your Thanksgiving spread. Everyone will be oohing and aahing!
- Crowd-Pleasing Flavor: They’re classic sugar cookies, so you know they taste delicious. A simple, sweet treat everyone will adore.
- Makes Baking a Blast: It turns baking into a fun activity, not a chore. Get ready for smiles all around!
Gather Your Ingredients for Thanksgiving Cookies
Alright, let’s get our supplies ready to bake up these adorable Thanksgiving cookies! You don’t need anything too fancy, just some good old pantry staples and a little bit of decorating magic. Having everything measured out and ready to go makes the whole process so much smoother, trust me!
Essential Dough Ingredients
First up, we need the goodies for the actual cookie dough. These are the building blocks for our delicious Thanksgiving sugar cookies:
- All-Purpose Flour: We’ll need 2 1/2 cups of this. It’s the backbone of our cookie!
- Baking Powder: Just 1 teaspoon to give our cookies a little lift.
- Salt: A pinch, about 1/4 teaspoon, to balance out all that sweetness.
- Unsalted Butter: 1 cup (that’s two sticks), and make sure it’s softened! This is key for creaming it properly.
- Granulated Sugar: 1 1/2 cups of this sweet stuff.
- Large Eggs: Two of them, to bind everything together.
- Vanilla Extract: 1 teaspoon to add that classic, cozy cookie flavor we all love.
Decorating Supplies for Festive Thanksgiving Turkey Cookies
Now for the fun part – making these cookies look like little turkeys! This is where we get creative:
- Royal Icing: You’ll need this in a few colors. Brown for the turkey body, red and yellow for the wattle and beak, orange for the feet, and a little black and white for the eyes. You can buy it pre-made or whip up your own!
- Food Coloring: Gel colors work best for vibrant shades without thinning out your icing too much.
- Edible Candy Eyes: These are a total game-changer for making the turkey faces pop! So easy and they look super cute.
- Piping Bags and Tips: Small round tips are great for outlining and details. You can use ziplock bags in a pinch, but piping bags give you more control.
How to Prepare Your Thanksgiving Turkey Cookies
Alright, let’s get down to business and make these amazing Thanksgiving cookies! It’s a pretty straightforward process, and honestly, the most crucial part is just being patient with the dough chilling and the cookies cooling completely before you start decorating. That’s the secret to no melty icing disasters, trust me!
Making the Cookie Dough Base
First things first, we need to get our cookie dough ready. In a medium bowl, I like to give the flour, baking powder, and salt a good whisk together. This just makes sure everything is evenly distributed, so you don’t get any weird pockets of salt or baking powder. Then, in a big bowl – the bigger the better, less mess! – cream together your softened butter and granulated sugar. You want this mixture to be super light and fluffy, almost like a pale yellow cloud. This is where you get that lovely texture! Beat in the eggs one at a time, making sure each one is mixed in before you add the next, and then stir in that lovely vanilla extract. Now, here’s where we combine things gently. Gradually add your dry ingredients to the wet stuff, mixing until it’s *just* combined. Don’t go crazy overmixing here, or your cookies might get tough. Just mix until you don’t see any more flour streaks. Then, divide the dough in half, flatten each half into a disc (this helps it chill evenly), wrap them up tight in plastic wrap, and pop ’em in the fridge for at least 30 minutes. This chilling step is super important for making them easy to cut!
Shaping and Baking Your Thanksgiving Sugar Cookies Easy
Once your dough has had a nice chill, preheat your oven to 350°F (175°C). Line a couple of baking sheets with parchment paper – this is a lifesaver for cleanup and makes sure your cookies don’t stick. Now, take one disc of dough and roll it out on a lightly floured surface. Aim for about 1/4-inch thickness; this is perfect for sturdy cookies that hold their shape. Grab your turkey cookie cutter and get to work! Place the cut-out cookies onto your prepared baking sheets, leaving a little space between them. Bake them for about 8 to 10 minutes. You’re looking for the edges to be just lightly golden. Don’t overbake them! Let them hang out on the baking sheets for a few minutes to firm up a bit before carefully transferring them to a wire rack to cool completely. Seriously, let them cool *all the way* before you even think about decorating.
Decorating Your Thanksgiving Cookies
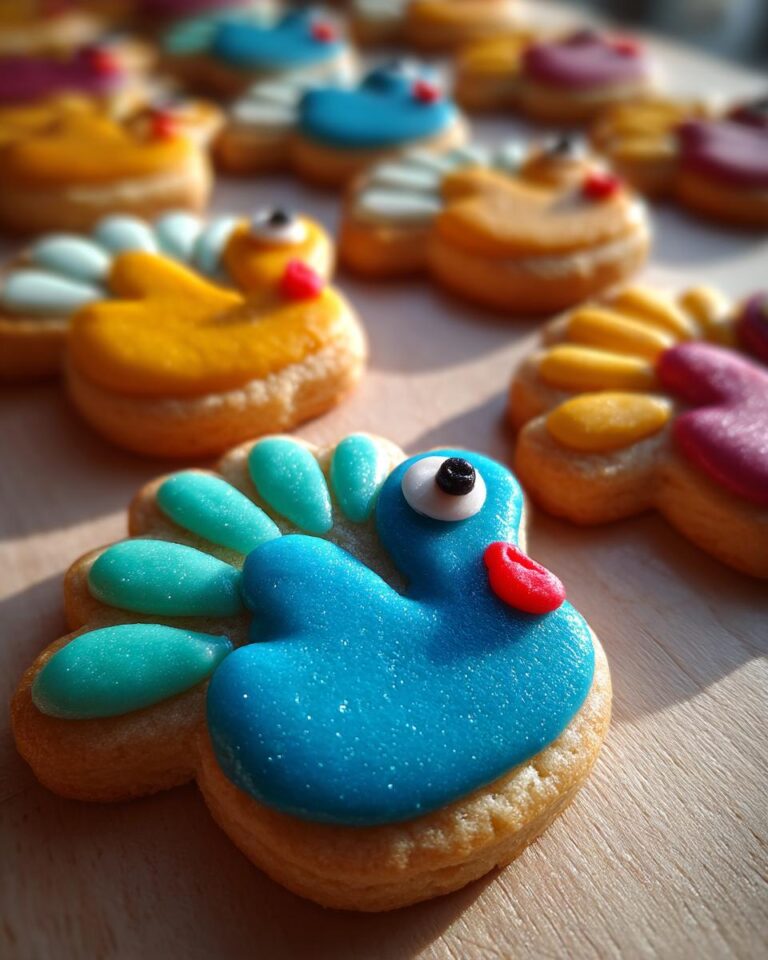
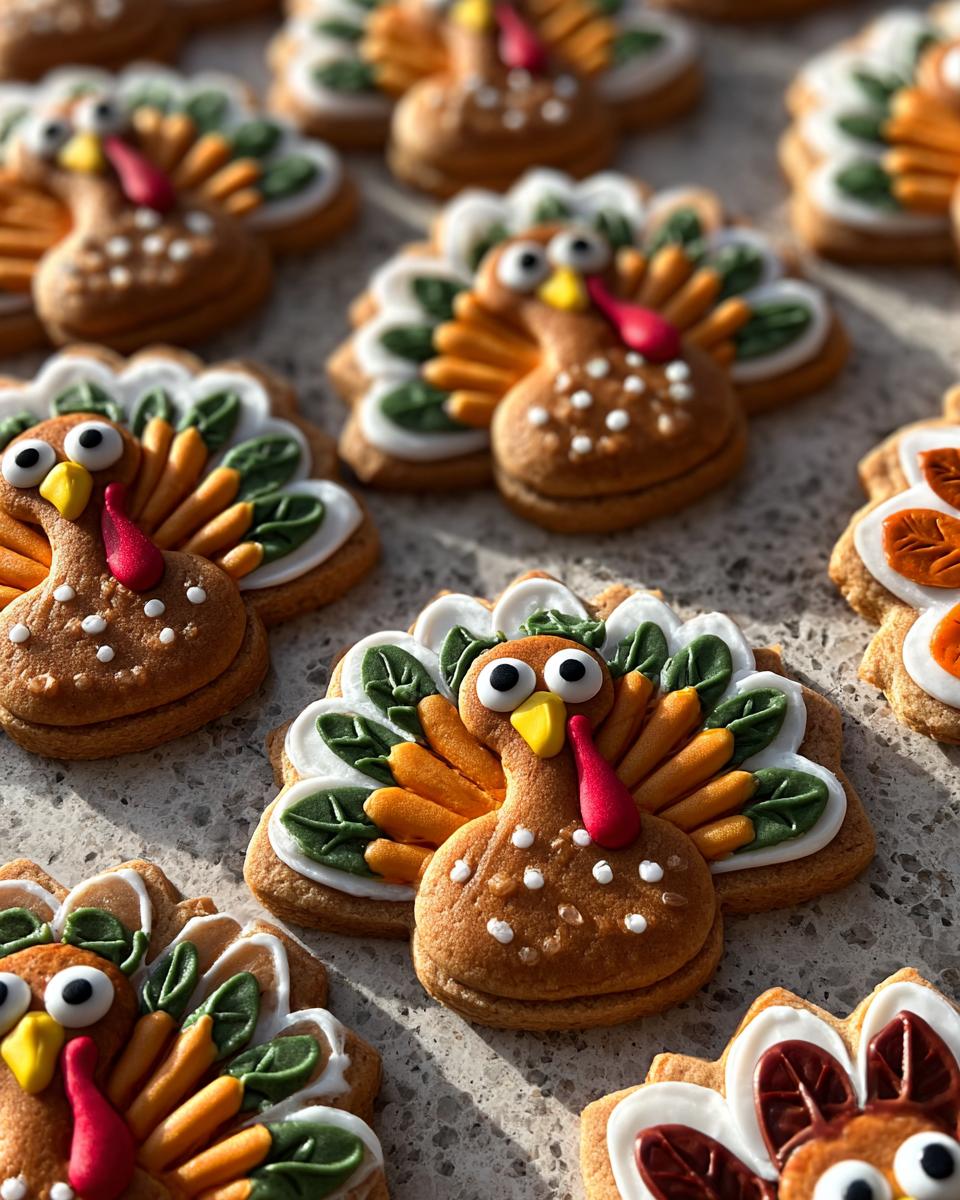
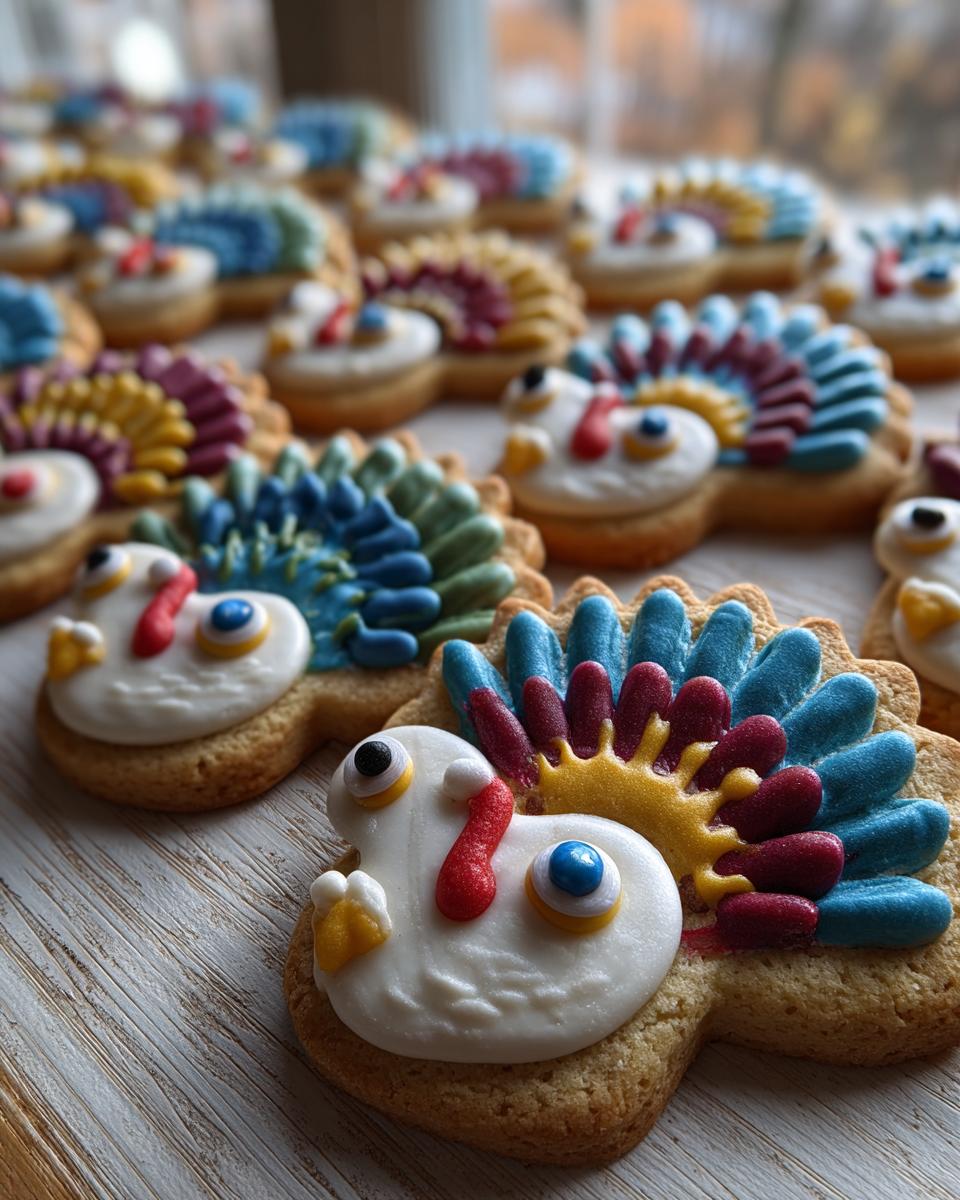
This is where the real fun begins! Once your Thanksgiving cookies are totally cool, it’s time to bring those turkeys to life. You’ll want to have your royal icing ready and divided into bowls, tinted with your food coloring. I like to start with the body of the turkey – usually a nice brown. Outline the shape with a slightly thicker icing, then ‘flood’ the inside with a thinner consistency. Let that dry for a bit before moving on to the feathers. For the feathers, you can pipe little arcs or blobs of red, yellow, and orange right next to each other. Don’t worry if they aren’t perfect; real turkeys have a wonderfully chaotic look! Then, add a little red wattle hanging from the head and an orange beak. And for the super cute face? Pop on those edible candy eyes! It’s amazing how just a couple of little eyes can make your decorated turkey cookies look so cheerful. It’s all about layering and letting each color dry a touch before adding the next. You’ve got this!

Tips for Perfect Thanksgiving Cookie Decorating
Okay, so you’ve got your cookies baked and cooled, and you’re ready to turn them into adorable little turkeys. It can seem a bit daunting, but I’ve got a few tricks up my sleeve that’ll make your Thanksgiving cookies look like they came straight from a bakery! It’s all about a few simple techniques and a little bit of patience.
Achieving the Best Icing Consistency
The secret to gorgeous decorated turkey cookies is all in the royal icing consistency. For outlining and details, you want it pretty thick – think toothpaste consistency. It should hold its shape when you pipe it. For ‘flooding’ the cookie (filling in the main areas), you want it a bit thinner, like honey. You can achieve this by adding a few drops of water at a time to your thicker icing until it’s just right. Test it by drizzling some off a spoon; it should flow smoothly and then level out after about 10-15 seconds. This difference is key for getting those clean lines and smooth fills!
Creative Thanksgiving Cookie Decorating Ideas
When you’re decorating your Thanksgiving cookies, don’t be afraid to get a little creative! For the turkey feathers, instead of just filling them in, try piping small, slightly curved lines of red, yellow, and orange right next to each other. They’ll look like little overlapping feathers! For the body, you can add a swirl or two of brown icing for texture. And don’t forget the little details – a tiny dot of white icing on the candy eye makes them look even cuter! You can also use a toothpick to gently swirl colors together before they dry for a marbled effect. It’s these little touches that make your simple Thanksgiving cookies really stand out and feel extra special for your holiday guests.
Storing and Serving Your Thanksgiving Cookies
Once all that hard work is done and your Thanksgiving turkey cookies are beautifully decorated and completely dry, you’ll want to make sure they stay looking and tasting their best. Proper storage is key to keeping these festive treats fresh and preventing any smudging of that gorgeous icing. Don’t let all your decorating efforts go to waste!
Best Practices for Storing Decorated Turkey Cookies
The absolute best way to store your decorated turkey cookies is in an airtight container. Seriously, this is non-negotiable! You want to keep out any humidity that could make your royal icing sticky or soft. Make sure the cookies are completely dry – give them at least a few hours, or even overnight, after decorating. If they’re still a bit soft, you can place a piece of parchment paper between layers of cookies to prevent them from sticking together or smudging. Keep the container at room temperature, not in the fridge, as that can sometimes affect the icing’s texture. They’ll stay perfectly delicious for up to a week this way, ready to be admired and devoured!
Frequently Asked Questions About Thanksgiving Cookies
Got questions about these cute little Thanksgiving cookies? I totally get it! Baking, especially decorating, can bring up all sorts of things. Let me clear up some of the common ones so your cookie-making journey is smooth sailing. These tips should help you make some truly easy cookies decorated that look super impressive!
Can I make these Thanksgiving Sugar Cookies Easy ahead of time?
Oh, absolutely! That’s one of the best things about holiday baking. You can totally make the cookie dough ahead of time. Just follow the steps up to chilling the dough, then wrap it up really well and keep it in the fridge for up to 3 days. When you’re ready, just let it sit out for about 10-15 minutes to soften up a bit before rolling. As for the decorated cookies, yes, they can be made ahead too! Once they’re completely dry, store them in an airtight container at room temperature, and they’ll be perfect for your Thanksgiving feast!
What is the best way to store undecorated Thanksgiving Cookies dough?
If you want to get a head start or just bake some cookies later, storing the undecorated dough is super simple. After you’ve divided it and flattened it into discs, wrap each disc tightly in plastic wrap. Make sure there are no air pockets! You can keep it in the refrigerator for up to 3 days. If you need to store it for longer, like a week or two, pop those wrapped discs into a freezer-safe bag or container and freeze it. When you’re ready to bake, just transfer the frozen dough to the fridge overnight to thaw, then let it soften slightly before rolling. Easy peasy!
Getting that professional look is all about a few key things! First, like we talked about, getting your royal icing consistency just right is HUGE. Thick for outlining, thinner for flooding. Second, take your time! Let the base flood icing dry *completely* before you start adding details like feathers or eyes. Rushing this step is how you get smudges. Also, using a scribe tool or a toothpick to gently guide the icing and pop any air bubbles makes a big difference. And don’t forget those candy eyes – they add instant polish with almost zero effort! Practice makes perfect, but even simple techniques can yield stunning results for your simple Thanksgiving cookies decorated.
Estimated Nutritional Information for Thanksgiving Cookies
Just a heads-up, the nutritional info for these yummy Thanksgiving cookies can really vary depending on the exact size of your cookies and how much icing and candy eyes you pile on! The numbers below are just an estimate for one decorated cookie.
Serving Size: 1 cookie
Calories: Approx. 150-200
Sugar: Approx. 15-20g
Sodium: Approx. 40-60mg
Fat: Approx. 8-12g

Easy Thanksgiving Cookies: Adorable Turkey Treats
- Total Time: 50 minutes (plus cooling and decorating time)
- Yield: Approximately 24 cookies
- Diet: Vegetarian
Description
Decorated sugar cookies shaped like turkeys, perfect for Thanksgiving celebrations. These easy-to-decorate cookies are a fun and festive treat for all ages.
Ingredients
- 2 1/2 cups all-purpose flour
- 1 teaspoon baking powder
- 1/4 teaspoon salt
- 1 cup (2 sticks) unsalted butter, softened
- 1 1/2 cups granulated sugar
- 2 large eggs
- 1 teaspoon vanilla extract
- For Decorating: Royal icing in various colors (brown, red, orange, yellow, black, white), edible candy eyes, piping bags and tips
Instructions
- In a medium bowl, whisk together flour, baking powder, and salt.
- In a large bowl, cream together softened butter and granulated sugar until light and fluffy.
- Beat in eggs one at a time, then stir in vanilla extract.
- Gradually add the dry ingredients to the wet ingredients, mixing until just combined.
- Divide the dough in half, flatten into discs, wrap in plastic wrap, and refrigerate for at least 30 minutes.
- Preheat oven to 350°F (175°C). Line baking sheets with parchment paper.
- On a lightly floured surface, roll out one disc of dough to 1/4-inch thickness.
- Cut out turkey shapes using a cookie cutter. Place cookies on prepared baking sheets.
- Bake for 8-10 minutes, or until edges are lightly golden. Let cool on baking sheets for a few minutes before transferring to a wire rack to cool completely.
- Prepare royal icing according to package directions or your recipe. Divide into bowls and tint with food coloring.
- Once cookies are completely cool, decorate them with royal icing to resemble turkeys. Use edible candy eyes for the turkey’s face.
- Allow decorated cookies to set completely before serving or storing.
Notes
- Ensure cookies are completely cool before decorating to prevent icing from melting.
- Royal icing dries hard, making it ideal for intricate designs.
- Store decorated cookies in an airtight container at room temperature.
- Prep Time: 30 minutes
- Cook Time: 10 minutes
- Category: Dessert
- Method: Baking and Decorating
- Cuisine: American
Nutrition
- Serving Size: 1 cookie
- Calories: Approximately 150-200 (will vary based on size and decoration)
- Sugar: Approximately 15-20g
- Sodium: Approximately 40-60mg
- Fat: Approximately 8-12g
- Saturated Fat: Approximately 5-7g
- Unsaturated Fat: Approximately 3-5g
- Trans Fat: 0g
- Carbohydrates: Approximately 20-25g
- Fiber: Approximately 0-1g
- Protein: Approximately 2-3g
- Cholesterol: Approximately 20-30mg


