
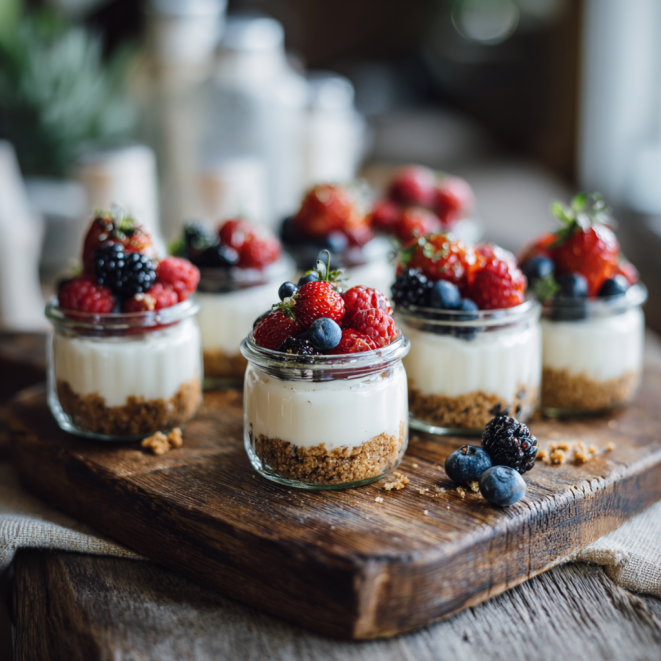
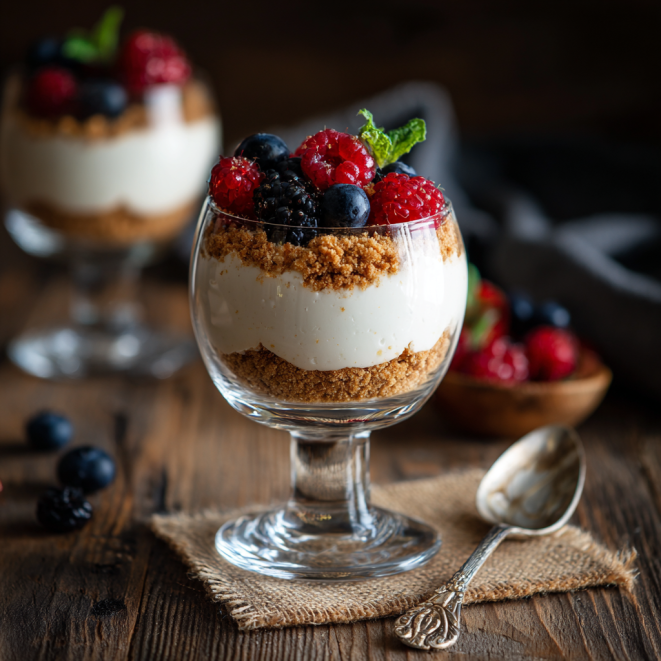
There’s something irresistible about desserts that come together quickly without turning on the oven. That’s where no bake cheesecake cups shine. They’re creamy, customizable, and perfect for when you want something sweet but don’t want the hassle of a full cheesecake. These mini cheesecake cups bring all the indulgence in a fun, individual size that makes serving effortless. Whether you’re hosting a party, craving a midnight treat, or planning an easy no bake dessert for family night, these cheesecake cups check every box. In the sections ahead, I’ll show you how to make them foolproof and endlessly versatile.
Check out this 5-Minute Chocolate Mug Cake Recipe for a quick and decadent dessert!
The Story & Why These Cups Work
A Dessert That Fits Every Occasion
I still remember the first time I discovered how much joy a simple cup of cheesecake could bring. It wasn’t the towering kind you see in bakeries—it was a humble little serving, layered with graham cracker crumbs, velvety filling, and a fresh berry on top. That moment showed me something important: no bake cheesecake cups don’t need to be complicated to feel special. Their charm lies in being accessible, fuss-free, and surprisingly elegant. These cups can slide into any setting, from a birthday spread to a last-minute weeknight craving.
The best part? You don’t need hours in the kitchen to make them shine. With just a few steps, you’ll have a tray of mini cheesecake cups that taste like pure comfort in a spoonful.
A Memory Worth Sharing
Food has a way of anchoring memories, and for me, cheesecake in a cup is one of those anchor points. I once made a batch of easy no bake dessert cups for a family cookout, and they disappeared before the burgers were even done. Everyone—from kids with sticky hands to grandparents savoring each bite—found joy in those little cups. They weren’t fancy, but they brought everyone together. That’s what makes no bake cheesecake cups so timeless: they balance simplicity with indulgence. Every bite carries a sense of care without demanding too much from the cook. That’s the kind of recipe worth keeping in your back pocket.
Why Choose Mini Cheesecake Cups
Benefits of Portion Control and Versatility
One of the biggest draws of mini cheesecake cups is portion control. Instead of cutting into a rich, oversized cheesecake, you get an individual serving that feels indulgent but balanced. Each cup is its own perfect slice—no messy cutting, no uneven pieces, and no leftovers that tempt you for days. This is especially helpful when you’re hosting. A tray of no bake cheesecake cups means guests can grab one, enjoy it, and still have room for other treats on the table.
Beyond portion size, these cups are endlessly versatile. Want a lighter take? Fold fresh fruit into the filling. Craving decadence? Swirl in melted chocolate or top with crushed cookies. Because they’re served in small cups or jars, you can make multiple flavors in the same batch. It’s like offering a dessert sampler without any extra effort. This flexibility is what makes them a favorite for both beginners and seasoned home cooks who love variety without complication.
Perfect for Gatherings and Quick Treats
If you’ve ever tried baking a full cheesecake, you know the risks: cracks, water baths, and long bake times. By contrast, easy no bake dessert cups take all the stress away. The filling comes together in minutes, chills in the fridge, and sets into a creamy dream without ever touching the oven. That’s why these cups are a lifesaver when you need a last-minute dessert.
Think about game nights, potlucks, or holiday parties—moments when you want something impressive but don’t want to spend the whole day in the kitchen. With mini cheesecake cups, you can prepare them the night before and serve chilled, saving you both time and stress. Even for everyday family dinners, these little cups are a treat that feels thoughtful without being overwhelming. They prove that you don’t need hours of prep or fancy equipment to deliver a dessert that makes people smile.
Print
No Bake Cheesecake Cups
- Total Time: 20 minutes
- Yield: 8 servings
- Diet: Vegetarian
Description
These No Bake Cheesecake Cups are creamy, indulgent, and wonderfully simple. With a buttery graham cracker crust, velvety cheesecake filling, and endless topping options, these mini desserts are perfect for parties, holidays, or weeknight cravings. Easy to make ahead, they’re a foolproof way to enjoy cheesecake without ever turning on the oven.
Ingredients
- 1 1/2 cups graham cracker crumbs
- 5 tablespoons unsalted butter, melted
- 16 oz (2 packages) cream cheese, softened
- 3/4 cup powdered sugar
- 1 teaspoon vanilla extract
- 2 teaspoons fresh lemon juice
- 1 cup heavy cream, cold
- Toppings of choice: berries, chocolate, caramel, or cookie crumbs
Instructions
- Prepare the Crust: Mix graham cracker crumbs with melted butter until combined. Spoon into cups or jars and press down firmly to create the base.
- Make the Filling: Beat softened cream cheese with powdered sugar until smooth. Add vanilla and lemon juice. In a separate bowl, whip the cream until soft peaks form, then fold gently into the cream cheese mixture.
- Assemble: Spoon or pipe filling over the crust layer in each cup, smoothing the tops.
- Chill: Cover and refrigerate for 2–3 hours or overnight until set.
- Serve and Enjoy: Top with fruit, chocolate, or your favorite garnish just before serving.
Notes
Make ahead up to 24 hours in advance for stress-free entertaining. Add toppings right before serving for the best texture. These cheesecake cups also freeze well—wrap tightly and store for up to 2 months.
- Prep Time: 20 minutes
- Cook Time: 0 minutes
- Category: Dessert
- Method: No Bake
- Cuisine: American
Nutrition
- Serving Size: 1 cup
- Calories: 320
- Sugar: 18g
- Sodium: 220mg
- Fat: 22g
- Saturated Fat: 13g
- Unsaturated Fat: 7g
- Trans Fat: 0g
- Carbohydrates: 28g
- Fiber: 1g
- Protein: 5g
- Cholesterol: 65mg
Ingredients and Equipment
Key Ingredients for Creamy No Bake Cheesecake Cups
The beauty of no bake cheesecake cups is how they transform a few simple ingredients into something that tastes like it took all day. At the heart of the recipe is cream cheese, which gives that signature tang and velvety texture. You’ll blend it with powdered sugar for sweetness and heavy cream to create a cloud-like consistency. A splash of vanilla extract ties it all together, while lemon juice brightens every bite.
The crust is equally straightforward: crushed graham crackers mixed with melted butter. It forms the buttery, crunchy base that balances the soft filling. From here, the possibilities open wide. Fresh fruit, chocolate shavings, cookie crumbs, or caramel drizzle can turn basic cups into customized masterpieces. Because the recipe is flexible, you can swap ingredients based on what’s in your pantry, making these mini cheesecake cups both practical and indulgent.
Tools That Make Prep Simple
You don’t need fancy gadgets to make this dessert. A sturdy mixing bowl, hand mixer (or stand mixer if you prefer), and a rubber spatula are enough to create the filling. Small jars, ramekins, or clear plastic cups work perfectly for layering. A food processor makes quick work of crushing graham crackers, but a rolling pin and zip-top bag get the job done too.
Here’s a quick side-by-side look at what you’ll use:
Ingredients vs Equipment for Mini Cheesecake Cups
| Ingredients | Equipment |
|---|---|
| Cream cheese | Mixing bowls |
| Powdered sugar | Hand or stand mixer |
| Heavy cream | Rubber spatula |
| Graham crackers | Food processor or rolling pin |
| Butter | Measuring cups/spoons |
| Vanilla & lemon juice | Serving cups/jars/ramekins |
With only a handful of items, you’ll see how approachable this dessert really is. These minimal needs make easy no bake dessert cups a recipe you can whip up in small kitchens, dorms, or even when traveling. The simplicity of both the ingredients and tools means there’s nothing stopping you from enjoying these creamy little treats anytime the craving strikes.
Step-by-Step Recipe Guide
Building the Crust
Every great cheesecake starts with a good crust, and mini cheesecake cups are no exception. Begin by crushing graham crackers until they resemble fine sand. If you’re using a food processor, it’ll take just a few pulses. For a simpler approach, place the crackers in a zip-top bag and crush them with a rolling pin. Once you’ve got fine crumbs, stir in melted butter until the mixture feels like damp sand that clumps together.
Spoon a tablespoon or two into the bottom of each cup or jar. Use the the bottom of a small glass or back of a spoon to press the crumbs down firmly. This step ensures your crust holds together when you scoop in later. Because these are no bake cheesecake cups, there’s no oven involved—the crust firms up perfectly in the fridge while you prep the filling.
Making the Cheesecake Filling and Assembling

The filling is what makes these cups shine. Start by beating softened cream cheese with powdered sugar until smooth and creamy. Add in vanilla extract and a touch of lemon juice to balance the richness. In a separate bowl, whip cold heavy cream until soft peaks form, then gently fold it into the cream cheese mixture. This step is what gives the filling that light, airy texture.
Spoon or pipe the filling over the crust layer in each cup, smoothing the tops for a polished finish. At this stage, you’ve created the base for countless variations. Keep them plain for a classic take, or add toppings like fresh berries, shaved chocolate, or caramel drizzle for a flavor boost.

Cover the cups and refrigerate for at least 2–3 hours, or overnight for the best set. The chill time allows the flavors to meld and the filling to firm up into that signature creamy bite. When you’re ready to serve, pull them straight from the fridge and enjoy the effortless indulgence. This method proves why these easy no bake dessert cups deserve a permanent spot in your recipe rotation: they’re stress-free, quick, and always a crowd-pleaser.
Creative Toppings & Flavor Variations
Classic Fruit and Chocolate Toppings
One of the joys of no bake cheesecake cups is how well they adapt to toppings. The creamy base is like a blank canvas, ready for whatever flavors you love. Fresh fruit is always a hit—think sliced strawberries, blueberries, or raspberries. A quick fruit compote can also be spooned on top for a more indulgent finish.
If chocolate is more your style, the options are endless. Drizzle melted dark or milk chocolate over the chilled filling, sprinkle mini chocolate chips, or swirl in Nutella before setting. Crushed Oreos, chocolate shavings, or even a dusting of cocoa powder can transform your mini cheesecake cups into a decadent treat without much effort. These small details add a big impact, making the dessert look elegant and taste like something straight from a bakery.
Seasonal and Party-Ready Variations
Part of the fun of an easy no bake dessert like this is how easily it shifts with the seasons. In fall, top your cups with a spoonful of pumpkin purée mixed with cinnamon and nutmeg for a pumpkin spice cheesecake twist. Winter is perfect for crushed peppermint candy, white chocolate drizzle, or even a dollop of cranberry sauce. Spring calls for lemon zest and fresh berries, while summer practically begs for tropical toppings like mango or pineapple.
For parties, think beyond the usual. Create a “topping bar” by setting out bowls of crushed cookies, nuts, caramel sauce, and fresh fruit, letting guests decorate their own cups. Kids love making their own combinations, and adults enjoy customizing flavors to their tastes. It’s an interactive way to turn no bake cheesecake cups into both dessert and entertainment.
No matter the season or occasion, these variations keep the recipe fresh and exciting. You’ll never feel like you’re serving the same dessert twice, even though the base recipe stays wonderfully simple. That’s the magic of these little cups: they adapt to your cravings, your pantry, and your calendar—always delicious, always customizable.
Tips, Storage & Make-Ahead Options
How to Keep Mini Cheesecake Cups Fresh
Once your no bake cheesecake cups are assembled, the fridge does most of the work. Cover them tightly with plastic wrap or snap-on lids if you’re using jars, and they’ll stay fresh for up to four days. The filling remains smooth, and the crust keeps its buttery crunch without getting soggy. For best results, add delicate toppings like whipped cream or fresh fruit right before serving—this keeps the presentation crisp and avoids wilting or soggy textures.
If you want to prep them even further in advance, the base and filling can be made separately. Store the crust crumbs in a sealed container and the cheesecake filling in the fridge for up to two days. When you’re ready, simply assemble and chill. This trick works especially well when planning for parties or gatherings, where every minute saved counts.
Freezer-Friendly Ideas for Easy No Bake Dessert Prep
One of the best-kept secrets about mini cheesecake cups is how well they freeze. Assemble the cups without fresh fruit toppings, then wrap each tightly in plastic wrap followed by foil. Stored this way, they’ll last up to two months in the freezer. To serve, transfer them to the fridge and let thaw overnight. The texture remains creamy, and they taste just as indulgent as when freshly made.
Freezing also makes these cups ideal for portion control. Instead of keeping a whole cheesecake around, you can stash a few in the freezer and pull one out whenever the craving hits. It’s like having a personal bakery on standby, ready to deliver an easy no bake dessert at a moment’s notice.
These storage and make-ahead tips not only extend the life of your cheesecake cups but also make entertaining stress-free. Whether you’re prepping ahead for a crowd or keeping a stash of ready-to-go treats for yourself, you’ll always be just a few hours away from a creamy, dreamy bite.
FAQs
How long do no bake cheesecake cups need to chill before serving?
They should chill for at least 2–3 hours, but overnight is best. This gives the filling time to firm up and ensures every bite of your mini cheesecake cups has the perfect creamy texture.
Can I make no bake cheesecake cups without heavy cream?
Yes, though heavy cream helps create that fluffy texture. If you don’t have it, you can substitute whipped topping for a lighter version. Just keep in mind the flavor will be a little sweeter and the texture slightly different.
How long do these easy no bake dessert cups last in the fridge?
Properly covered, no bake cheesecake cups last up to 4 days in the refrigerator. For toppings like fresh fruit or whipped cream, add them right before serving to keep the presentation fresh.
Can I freeze mini cheesecake cups for later?
Absolutely! Wrap each cup tightly in plastic wrap and foil, then freeze for up to 2 months. Thaw in the fridge overnight before serving. They keep their creamy texture and make a convenient easy no bake dessert whenever cravings strike.
Conclusion
When you think about desserts that impress without stress, no bake cheesecake cups deserve the spotlight. They’re simple to make, endlessly customizable, and fit just about any occasion. With their creamy filling, buttery crust, and flexible topping options, these mini cheesecake cups deliver all the flavor of a classic cheesecake in a fun, easy-to-serve size.
Whether you’re preparing for a party, stocking the fridge with make-ahead treats, or craving a quick indulgence, this recipe proves that a memorable dessert doesn’t have to be complicated. By adding your own creative twists—like seasonal toppings or flavor variations—you’ll turn these cups into a personal signature dish.
Most importantly, these little cheesecakes remind us that sometimes the most satisfying sweets are the ones that bring joy without demanding hours in the kitchen. Keep this recipe handy, and you’ll always have an easy no bake dessert ready to wow family, friends, or simply yourself.
Discover more culinary ideas and easy recipes on Facebook and Pinterest.


