

Oh, the holidays! They’re all about gathering, cozy vibes, and, of course, *amazing* food. And when it comes to holiday entertaining, I’ve learned that the less time I spend stressed in the kitchen, the more time I have to actually enjoy my guests. That’s where the magic of a Holiday Dessert Charcuterie Board comes in! Seriously, it’s my absolute go-to for parties, potlucks, or just a cozy night in. It looks so fancy and festive, but trust me, it’s ridiculously easy to put together. I’ve found that these boards are just universally loved – everyone gets to pick exactly what they want, and it makes for such a fun, interactive dessert experience. It’s the perfect way to bring a little extra sparkle and deliciousness to any holiday get-together without all the fuss!
Why You’ll Love This Holiday Dessert Charcuterie Board
Honestly, this board is a lifesaver during the holidays! It’s the ultimate crowd-pleaser because everyone gets to build their own perfect bite. Forget stressing over multiple desserts; this one does all the work for you. It’s so easy to whip up, looks absolutely gorgeous, and is totally customizable. It’s one of my favorite charcuterie dessert ideas because it’s so versatile.
- Quick Assembly For Busy Hosts: Seriously, you can throw this together in about 15 minutes flat. It’s all about assembly, not baking, which is a huge win when you’ve got a million other things to do during the holidays.
- Visually Stunning Presentation: Who doesn’t love a beautifully arranged board? It adds such a festive touch to your table, making it feel extra special without any real effort. It’s an easy fruit charcuterie board that looks like you spent hours on it.
- Customizable For Every Palate: This is the best part! You can tailor it to exactly what your guests love. It’s perfect for a charcuterie potluck because everyone can contribute their favorite dip or fruit, and it works for all sorts of tastes.
Gathering Your Holiday Dessert Charcuterie Board Ingredients
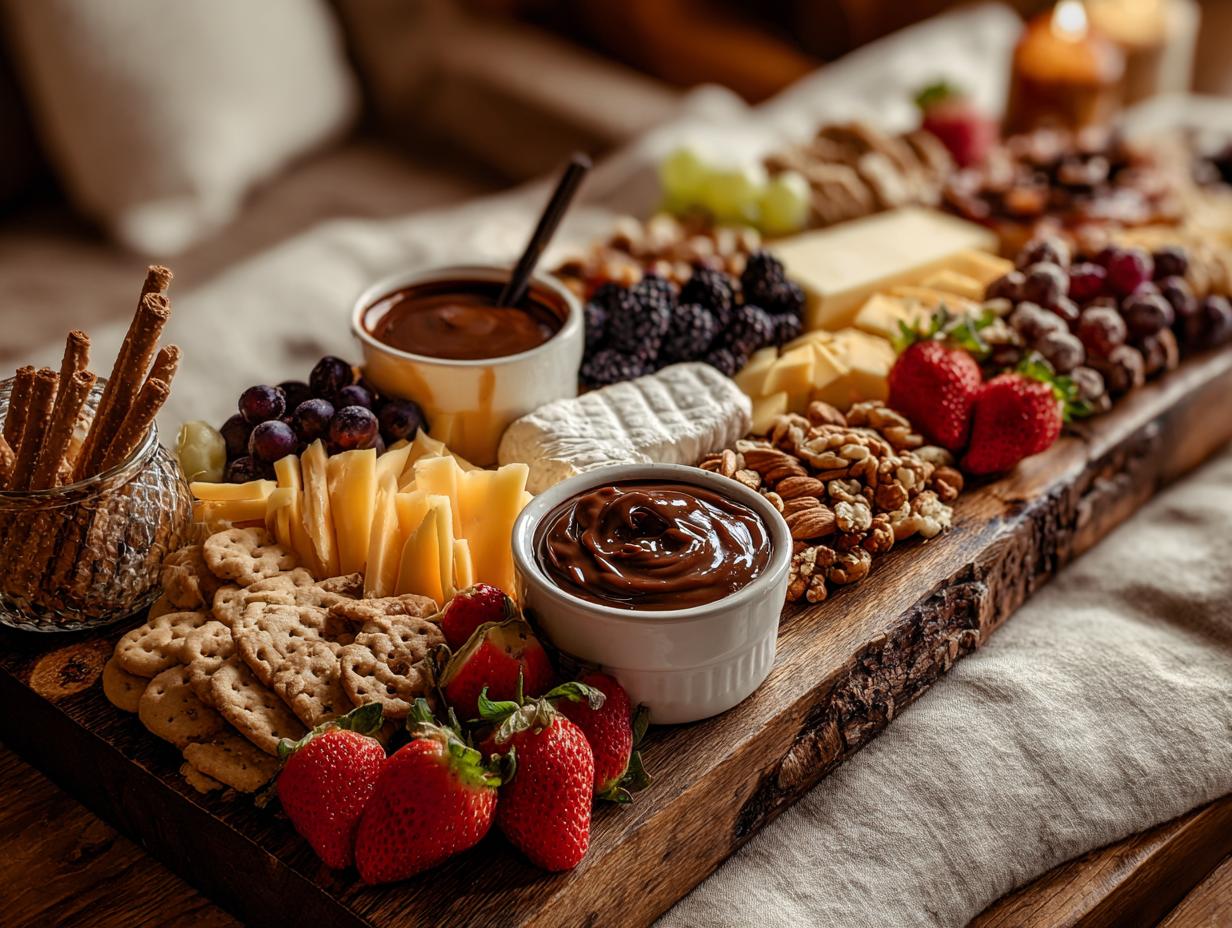
Alright, let’s talk about what goes onto this glorious Holiday Dessert Charcuterie Board! The secret sauce is all about variety and balance. You want a little bit of everything – sweet, savory, creamy, crunchy. It’s not just about throwing random things on a board; it’s about creating a culinary landscape that’s pleasing to the eye and the palate. Think of it as building your own perfect bite, over and over again. For a fantastic Apple Dessert Board, we’re going to focus on textures and flavors that just sing together, especially those cozy fall and winter vibes.
Fresh Fruits For Sweetness
First up, we need some beautiful fresh fruit! I love using a mix of colors and textures. For this board, sliced apples and pears are a must – make sure to slice them just before you assemble so they don’t turn brown. Grapes are always a winner, either whole or halved, and a scattering of fresh berries like raspberries or blueberries adds a lovely pop of color and tartness. Using seasonal produce really makes it feel like a true Fall Food Charcuterie Board.
Cheeses To Complement Sweets
You might think cheese is just for savory boards, but trust me, it’s a game-changer on a dessert board! The slight saltiness and creaminess cut through the sweetness beautifully. I like to include a few different kinds. Think about some sharp cheddar cubes, a creamy wedge of brie, and maybe some tangy goat cheese crumbles. It’s what makes it a perfect Apple And Cheese Charcuterie Board – that classic combo is just unbeatable, and it really elevates the whole Apple And Cheese Board experience.
Dips For Indulgence
Now for the really fun part – the dips! These are like the little pools of deliciousness that tie everything together. For this board, you absolutely can’t go wrong with a smooth caramel dip and a rich chocolate dip. They’re just universally loved and perfect for dipping just about everything on the board. This is where the Fruit Dip Charcuterie Board concept really shines!
Crunchy And Chewy Textures
To round things out, we need some serious texture! I love adding a mix of nuts like whole almonds or chopped walnuts for that satisfying crunch. Then, some crackers or cookies – maybe some shortbread or graham crackers – to give people something to scoop with. And don’t forget dried fruits! A handful of dried cranberries or apricots adds a lovely chewy element and a bit of concentrated sweetness.
Optional Festive Additions
This is where you can really let your creativity shine! For those extra-special touches, I love adding things like mini marshmallows (perfect for dipping!), some extra chocolate chips for snacking, or even a few cinnamon sticks for aroma and visual appeal. These little extras really help you nail those unique Charcuterie Board Themes Fall or whatever holiday you’re celebrating!

Assembling Your Perfect Holiday Dessert Charcuterie Board
Okay, putting this gorgeous board together is honestly the most fun part! It’s all about making it look abundant and inviting. Think of it like creating edible art. You want everything to be easily accessible, so people can just grab and go. This is where the magic happens for your Holiday Dessert Charcuterie Board, and it’s so much easier than you think, making it a truly easy fruit charcuterie board to create!
Prepare Your Base
First things first, grab your serving platter or a nice, big cutting board. The bigger, the better, in my opinion, because it makes the board look super full and impressive. Make sure it’s clean and dry. If you’re using a wooden board, give it a quick wipe down. This is your canvas, so start with a good foundation!
Strategically Place Your Anchors
Now, let’s place the stars of the show: your dips and cheeses. Put your small bowls of caramel and chocolate dip on the board first. I like to put them a little off-center or spread them out so people can reach them from different sides. Then, arrange your cheeses around them. Wedge the brie so it looks soft and inviting, scatter the goat cheese crumbles, and stack the cheddar cubes. These are your focal points!
Fill In With Fruits And Textures
This is where the board really comes to life! Start tucking your prepared fruits in between the dips and cheeses. Fan out those apple and pear slices, let the grapes tumble in, and nestle the berries. Then, fill in all the little gaps with your nuts, crackers, cookies, and dried fruits. I love to create little piles and clusters so there’s a variety of textures all over the board.
Add The Finishing Touches
Finally, it’s time for those little extras that make it extra special! Tuck in your optional marshmallows, chocolate chips, or cinnamon sticks anywhere there’s a little empty space. Don’t be afraid to let things overlap a bit – it just makes the board look more abundant and festive. A quick glance to make sure everything is stable and looks good, and voilà! Your stunning dessert board is ready to impress.

Tips for a Stunning Holiday Dessert Charcuterie Board
Creating a show-stopping dessert board is all about a few key things. It’s not just throwing stuff on a plate; it’s about making it look intentional and totally delicious. I’ve found that paying attention to a few details really makes a difference. These little tricks help elevate your board from just “food” to a real centerpiece, and they make all those charcuterie dessert ideas come to life!
Consider Seasonal Flavors
For the best impact, think about the season! If it’s fall or winter, lean into those cozy flavors. Think apples, pears, cinnamon, caramel, and maybe some cranberries. For holiday themes, you can incorporate red and green fruits, peppermint candies, or even little gingerbread cookies. It just makes the board feel extra special and connected to the celebration!
Balance Sweet And Savory Notes
This is super important! While it’s a dessert board, a little bit of savory really makes the sweet flavors pop. That’s why including cheeses is a must. The creaminess of brie or the sharpness of cheddar against sweet fruits and caramel is just *chef’s kiss*. It keeps things interesting and prevents the board from being overwhelmingly sweet. It’s the secret to making your Apple And Cheese Charcuterie Board totally irresistible!
Frequently Asked Questions About Holiday Dessert Charcuterie Boards
Got questions about whipping up the perfect Holiday Dessert Charcuterie Board? I get it! These boards are so much fun, and a few little tips can make all the difference. Here are some common things people ask me:
What are the best fruits for a Holiday Dessert Charcuterie Board?
Oh, I love this question! For a great Holiday Dessert Charcuterie Board, you really want fruits that are sturdy and hold up well. Think crisp apples and pears – just slice ’em right before serving so they don’t brown. Grapes are always a winner, and fresh berries like raspberries, blueberries, or even some pomegranate seeds add gorgeous color and a little tartness. They make any Apple Dessert Board look fantastic!
Can I make a Holiday Dessert Charcuterie Board ahead of time?
You can definitely prep some components ahead, which is HUGE for holiday sanity! Wash and cut your fruits, get your cheeses ready, and portion out your dips into their little bowls. Store everything separately in the fridge. Then, about 30 minutes before guests arrive, just assemble everything on your board. This way, your fruits stay fresh and your dips don’t get weird. It’s still super quick, but having things prepped makes it a breeze. It’s the best way to handle a charcuterie potluck!
How do I make my Holiday Dessert Charcuterie Board look professional?
It’s all about arrangement and variety! For that pro look on your Holiday Dessert Charcuterie Board, start with your dips and cheeses as your anchors. Then, fill in the gaps with your fruits, nuts, and crackers, creating little clusters and piles. Think about color contrast – bright berries next to creamy cheese, for example. Using different textures, like smooth dips, crunchy nuts, and chewy dried fruit, also adds depth. Don’t be afraid to let things overlap a bit; it makes the board look bountiful and inviting!
Storage and Reheating
So, what if you have a few bits left over? Don’t worry! The best way to store any remaining goodies from your Holiday Dessert Charcuterie Board is to carefully transfer them into airtight containers. Wrap any leftover fruits tightly, and store dips and cheeses separately in the fridge. Honestly, most of this board is best served fresh, so reheating isn’t really a thing. The fruits might get a little soft if stored overnight, but they’re still totally edible! Just aim to finish it up within a day or two for the best quality.
Estimated Nutritional Information
Okay, so when it comes to the nutrition for a Holiday Dessert Charcuterie Board, it’s a bit like trying to nail down the exact ingredients in a secret family recipe – it really depends on what you put on it! Because everyone customizes their board with different fruits, cheeses, dips, and treats, the exact calories, sugar, fat, and everything else can vary wildly. So, I can’t give you super precise numbers, but just know that it’s a delicious indulgence meant for sharing and enjoying during special times! You can find more inspiration for holiday treats on Pinterest.
Print
Holiday Dessert Charcuterie Board: 15-Minute Masterpiece
- Total Time: 15 minutes
- Yield: 6-8 servings
- Diet: Vegetarian
Description
A festive and easy-to-assemble dessert charcuterie board perfect for holidays and fall gatherings. It features a variety of sweet and savory elements, including fruits, cheeses, dips, and crunchy treats.
Ingredients
- 2 cups assorted fresh fruits (e.g., apple slices, pear slices, grapes, berries)
- 1 cup assorted cheeses (e.g., cheddar cubes, brie wedges, goat cheese crumbles)
- 1/2 cup caramel dip
- 1/4 cup chocolate dip
- 1/2 cup assorted nuts (e.g., almonds, walnuts)
- 1/2 cup assorted crackers or cookies
- 1/4 cup dried fruits (e.g., cranberries, apricots)
- Optional: mini marshmallows, chocolate chips, cinnamon sticks
Instructions
- Wash and prepare all fresh fruits. Slice apples and pears.
- Arrange cheeses on the board.
- Place dips in small bowls and position them on the board.
- Add fruit, nuts, crackers, and dried fruits around the dips and cheeses.
- Fill in any empty spaces with optional treats.
- Serve immediately.
Notes
- Use a large platter or cutting board for assembly.
- Customize with your favorite seasonal fruits and dips.
- Consider adding a small cheese knife.
- Prep Time: 15 minutes
- Cook Time: 0 minutes
- Category: Dessert
- Method: Assembly
- Cuisine: American
Nutrition
- Serving Size: 1 board serving
- Calories: Varies based on ingredients
- Sugar: Varies based on ingredients
- Sodium: Varies based on ingredients
- Fat: Varies based on ingredients
- Saturated Fat: Varies based on ingredients
- Unsaturated Fat: Varies based on ingredients
- Trans Fat: Varies based on ingredients
- Carbohydrates: Varies based on ingredients
- Fiber: Varies based on ingredients
- Protein: Varies based on ingredients
- Cholesterol: Varies based on ingredients


