

Oh, my goodness, where do I even begin?! I’m just bursting with excitement to share these amazing vintage cake recipes with you! Remember those cakes Grandma used to make? The ones that just *screamed* comfort and happy memories? Well, guess what – I’ve gathered up a treasure trove of 27 Vintage Cakes Like Grandma Used To Make, and I’m practically giddy to share them all with you!
I’ve always loved baking, especially when it comes to old-fashioned desserts. Those classic flavors just take me right back to my childhood, sitting at the kitchen table, watching my own Grandma work her magic. And trust me, these recipes are pure magic. This blog is all about sharing those cherished tastes, the ones that warm your heart and fill your kitchen with the most amazing smells. I’ve spent years perfecting these, so you know you’re getting the real deal! I’m here to help you recreate those delicious memories – and maybe make some new ones of your own. Let’s get baking!
Ingredients for Making the Best 27 Vintage Cakes Like Grandma Used To Make
Okay, so before we get started, let’s gather our goodies! You’ll need the basics, of course: all-purpose flour (gotta have it!), granulated sugar (the sweeter, the better!), those lovely large eggs (fresh is best, I always say!), and unsalted butter (softened, but not melted – trust me!). And don’t forget the milk, vanilla extract, a bit of baking powder or baking soda! Ah, and the frosting, too. You can’t have a cake without frosting!
Essential Baking Supplies
Now, for the fun stuff! You’ll want a stand mixer (or a good hand mixer will do!), measuring cups and spoons (accurate measurements are key, friends!), a few mixing bowls in different sizes, and of course, baking pans! I usually use either a 9×13 inch pan, or a round 9-inch pan. Oh, and don’t forget a cooling rack. Get ready to bake!
Step-by-Step Instructions to Bake 27 Vintage Cakes Like Grandma Used To Make
Alright, let’s get those aprons on and get baking! I’m going to walk you through each step, nice and easy. You’ll be a vintage cake pro in no time, I promise!
Preparing Your Baking Pans
First things first: we’ve gotta prep those pans! You know how Grandma always did it? That perfect cake release? Well, you can do it too! Grease and flour your pans – I like to use shortening and then dust with flour, tapping out the excess. Or, if you’re fancy, you can line them with parchment paper. That makes getting the cake out a total breeze. Seriously, don’t skip this step!
Creaming Butter and Sugar
Next up: creaming the butter and sugar! This is where the magic really starts to happen. Get your softened butter in a bowl and beat it with your mixer until it’s nice and smooth. Then, gradually add the sugar and keep beating until it’s light and fluffy. This step is super important, because it incorporates air into the batter, which gives your cake that perfect, tender texture. It’s so worth it!
Adding Eggs and Dry Ingredients
Okay, now for the exciting part! Add those eggs, one at a time, mixing well after each addition. Then, it’s time to alternate adding the dry ingredients (flour, baking powder/soda) and the wet ingredients (milk, vanilla), starting and ending with the dry. Remember to fold the ingredients in gently – we don’t want to overmix! Just until everything is combined.
Baking and Cooling Your Vintage Cakes
Alright, preheat your oven to the temperature the recipe calls for. Usually, it’s around 350°F (175°C), but double-check! Pour your batter into your prepared pans and bake for about 30-35 minutes, but keep an eye on it! To check if it’s done, stick a toothpick in the center – if it comes out clean, it’s ready. Let it cool completely in the pan before frosting. This is so important – trust me, I’ve learned the hard way!
Why You’ll Love These 27 Vintage Cakes Like Grandma Used To Make
Honestly, what’s not to love? These cakes are pure joy!
- They’re surprisingly easy to make, even for beginner bakers.
- The flavors? Unforgettable! Think warm spices, rich butter, and sweet, sweet memories.
- Each bite is a hug from Grandma, pure nostalgia!
- Perfect for birthdays, holidays, or any day you want a little extra sweetness.
Seriously, get ready to fall in love!
Tips for Baking Perfect Old Fashioned Cakes Every Time
Okay, so you want to bake a perfect cake? I can help with that! Baking is a science, so a few simple tips can make all the difference between a good cake and a *wow* cake. I’m here to give you some of my best secrets!
Accurate Measurement is Key
First things first: measure everything *carefully*! I always say baking is like chemistry. Use those measuring cups and spoons exactly. And honestly, if you really want to step up your game, get a kitchen scale! It’s the best way to ensure perfect results every single time. Trust me, it’s a game-changer!
Don’t Overmix the Batter
Next up: don’t overmix! I know, I know, it’s tempting to keep whisking until everything looks perfectly smooth. But overmixing develops too much gluten, which can make your cake tough. Mix the batter just until the ingredients are combined. A few streaks of flour? Totally fine!
**Classic Vintage Cake Recipes** Variations and Substitutions
Want to get creative with your baking? Absolutely! These recipes are super flexible, so don’t be afraid to experiment. Remember that baking is all about having fun and making it your own. Let’s get creative and make something unique! You can change it up to fit your taste!
Flavor Enhancements
So, you want to add a little *oomph*? My favorite way to do that is with flavor extracts! A dash of lemon zest in a vanilla cake? Yum! Or how about a teaspoon of almond extract in a chocolate cake? Ooh la la! Just be careful – a little goes a long way. Trust me, it makes a huge difference!
Gluten-Free and Vegan Options
Now, I know some of us have different dietary needs, and that’s totally cool! While I haven’t tried *every* recipe gluten-free or vegan, the good news is that many of these Old Fashioned Cakes can be adapted! You can find tons of great gluten-free flour blends and vegan butter substitutes out there. Just do a little research and have fun!
Serving Suggestions for Your Antique Cake Recipes
Okay, so you’ve baked the perfect cake – now what?! Well, my friend, that’s where the fun *really* begins! I love serving these Antique Cake Recipes with some fresh berries, like strawberries or raspberries. Or, you could add a dollop of homemade whipped cream, it’s the best! And, hey, a scoop of vanilla ice cream never hurt anyone, right? Get creative and have fun!
Storage and Reheating Guide for Vintage Cake Recipes Homemade
Okay, so you’ve got this amazing cake, and you want to keep it tasting just as good tomorrow? No problem! The best way to store your Vintage Cake Recipes Homemade is in an airtight container at room temperature. That keeps it nice and moist! It should last a good 3-4 days that way, maybe even longer! If you want to keep it longer, pop it in the fridge. Be sure to bring it back to room temperature before you serve it, to get that fresh-baked flavor!
Frequently Asked Questions about Vintage Cake And Dessert Recipes
I know, I know, you probably have a million questions, and that’s totally okay! Baking can be a little intimidating, but trust me, it’s worth it! So, let’s dive into some of the most common questions I get about these Vintage Cake And Dessert Recipes. I’m here to help you every step of the way!
Can I freeze these cakes?
Absolutely! Freezing is a great way to save your delicious baked goods for later. Just wrap the cooled cake tightly in plastic wrap, then foil, and pop it in the freezer. It should last for about 2-3 months. When you’re ready to enjoy it, let it thaw at room temperature. Easy peasy!
How can I prevent my cake from sticking to the pan?
Oh, the dreaded sticking! Ugh. But don’t worry, I’ve got you covered! The key is to properly prepare your pans. I always grease and flour my pans, which creates a barrier. Or, even better, use parchment paper! Cut a circle to fit the bottom, and you can practically flip the cake right out. No more sticking!
What if I don’t have all the ingredients?
Don’t sweat it if you’re missing something! Baking is all about creativity. If you don’t have buttermilk, for example, you can add a tablespoon of lemon juice or vinegar to your milk and let it sit for a few minutes. You can also find all sorts of substitutions online for nearly every ingredient. Just do a little research, and you’ll be golden!
How long will the cake last?
So, how long will your cake stay fresh? Well, if you store it properly in an airtight container at room temperature, your cake should last for about 3-4 days. If you want to keep it longer, you can store it in the refrigerator, but it might dry out a bit. Just bring it back to room temperature before serving, and it should be good as new!
Estimated Nutritional Information for Vintage Cake Recipes Grandmothers
Okay, so, let’s talk numbers! Keep in mind that the nutritional info is just an estimate. It can change depending on the ingredients and brands you use. Just a heads up!
Okay, friends, I want to hear all about it! Did you try one of these recipes? How did it go? Leave me a comment, rate the recipe, and share your baking journey with me! I can’t wait to hear from you!
For more baking inspiration, check out Dishlyum on Pinterest!
Print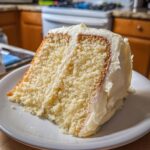
27 Vintage Cakes: The Best Grandma Ever Made!
- Total Time: 55 minutes
- Yield: 12 servings
- Diet: Vegetarian
Description
Discover classic cake recipes that bring back nostalgic flavors. These vintage cakes are just like Grandma used to make.
Ingredients
- Flour
- Sugar
- Eggs
- Butter
- Milk
- Vanilla extract
- Baking powder/soda
Instructions
- Preheat oven.
- Cream butter and sugar.
- Add eggs.
- Mix in dry ingredients.
- Add wet ingredients.
- Bake until done.
- Frost and enjoy.
Notes
- Adjust baking time as needed.
- Use fresh ingredients for best results.
- Let the cake cool completely before frosting.
- Prep Time: 20 minutes
- Cook Time: 35 minutes
- Category: Dessert
- Method: Baking
- Cuisine: American
Nutrition
- Serving Size: 1 slice
- Calories: 350
- Sugar: 30g
- Sodium: 150mg
- Fat: 20g
- Saturated Fat: 10g
- Unsaturated Fat: 8g
- Trans Fat: 0g
- Carbohydrates: 40g
- Fiber: 2g
- Protein: 4g
- Cholesterol: 75mg


